
A water heater leak is more than just an inconvenience; it’s a potential threat to your home. When you notice your water heater leaking from top cold water inlet, acting quickly is key to preventing costly water damage to your floors and walls. While the sight of a leak is stressful, it’s also a clear warning sign that your system needs attention. This guide is designed to give you the confidence to assess the situation safely. We’ll cover the essential first steps, like shutting off the power and water, and help you determine if you’re dealing with a simple fix or a problem that requires professional expertise from a trusted Tucson plumber.
Key Takeaways
- Pinpoint the leak’s origin before doing anything else: A drip near the cold water inlet can be a simple loose fitting or a sign of a failing tank, so finding the exact source helps you determine the right next step.
- Recognize the signs that require a professional: If your DIY fixes don’t work, you see significant rust on the tank, or your water heater is more than 10 years old, it’s time to call for an expert diagnosis.
- Prevent future problems with routine care: You can avoid most leaks by scheduling annual maintenance, flushing the tank to clear out sediment, and making sure your home’s water pressure is at a safe level.
Why Is Your Water Heater Leaking at the Cold Water Inlet?
Discovering a puddle around your water heater is never a welcome sight. When you trace the drip back to the top of the unit, specifically around the cold water inlet, it can be even more confusing. The good news is that a leak in this spot points to a few common culprits, ranging from simple fixes to more serious problems. Before you panic, it’s helpful to understand what might be happening with your system. Identifying the potential cause is the first step toward getting your hot water running smoothly and safely again. Our team handles all types of residential plumbing issues and can help you pinpoint the exact source of the leak. Below are the most frequent reasons for a leak at the cold water inlet.
Loose or Corroded Pipe Connections
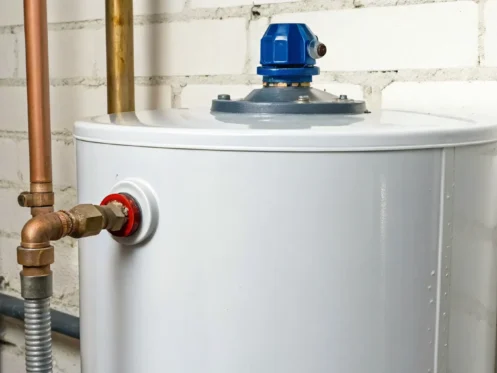
The simplest explanation is often the right one. The connection where the cold water supply line meets the tank can simply become loose over time. Vibrations from the unit or the natural expansion and contraction of the metal pipes can cause the fittings to loosen, allowing water to seep out. Another common issue is corrosion. If the pipes or fittings are old, rust can form and eat away at the metal, creating a weak spot for a leak to develop. A quick visual inspection for drips or rust stains around the connection is a great starting point for diagnosis.
A Faulty Pressure Relief Valve
Every water heater has a temperature and pressure (T&P) relief valve. This critical safety feature is designed to automatically release water if the temperature or pressure inside the tank gets too high, preventing a potential explosion. While it’s meant to protect you, this valve can sometimes fail. It might get stuck, wear out, or develop a faulty seal, causing it to leak water from the top of the heater. If you notice water coming from a small pipe connected to this valve, it’s a clear sign that the T&P valve needs attention from a professional.
Worn-Out Inlet Valve Parts
The cold water inlet itself is a valve, and like any mechanical part, it can wear down with use. Inside the valve are small components like washers and O-rings that create a watertight seal. Over the years, these parts can become brittle, crack, or degrade, compromising the seal and allowing water to drip out. This type of leak often starts as a slow, intermittent drip right at the valve handle or where the pipe enters the tank, but it can worsen over time if not addressed.
Tank Corrosion or Old Age
A leak around the inlet pipe can sometimes signal a more serious problem: the tank itself is failing. If your water heater is more than 10 years old, internal corrosion could be eating away at the tank lining. This rust can create weak spots, especially around the threaded openings where pipes connect. If you see significant rust on top of the heater or notice the leak is coming from the tank itself rather than the pipe fitting, it’s a strong indicator that the tank is compromised. In this situation, a full replacement is almost always necessary.
How to Find the Source of the Leak
When you spot a puddle around your water heater, your first instinct might be to panic. But before you do anything else, you need to play detective and find exactly where the water is coming from. A leak at the top of the tank can be caused by several different issues, from a simple loose fitting to a more serious problem with the tank itself. Pinpointing the source is the most important first step because it determines whether you’re looking at a quick DIY fix or a job for a professional. Let’s walk through a few simple checks you can do to identify the culprit.
Perform a Visual Check
First things first, grab a flashlight and a dry paper towel. The top of your water heater can be a busy place with pipes and valves, and water can drip down and travel, making the source tricky to find. Thoroughly dry the entire top surface of the water heater and all the connections. Once everything is dry, watch closely for new water droplets to form. This simple trick helps you see the exact spot where the leak begins. Pay close attention to the base of the cold water inlet and hot water outlet pipes, as these are common problem areas.
Test Each Component
If the leak is coming from one of the connections, your next step is to check each part. Look closely at the cold water inlet pipe, the hot water outlet pipe, and the temperature and pressure (T&P) relief valve. Sometimes, the fix is as simple as a loose connection that needs a gentle tightening with a wrench. Also, check the T&P valve’s discharge tube to see if it’s constantly dripping. If it is, the valve might be failing. While some of these fixes are straightforward, anything involving replacing parts is best left to our team’s residential plumbing experts.
Look for Signs of Rust
While you’re inspecting the top of the tank, keep an eye out for rust or corrosion. If you see rust streaks running down the side of the tank or bubbling paint, it often points to a much bigger problem. Rust is a clear sign that the tank itself is corroding from the inside out. Unfortunately, a corroded tank can’t be repaired and will need to be replaced. Catching these issues early is one of the biggest benefits of scheduling annual maintenance, which can save you from the headache of a major leak down the road.
Found a Leak? Here’s What to Do First
Discovering a puddle around your water heater is stressful, but taking a few immediate steps can prevent a small problem from turning into a major disaster. Acting fast helps protect your home from water damage and makes the repair process smoother. Before you even think about calling for help, there are three key things you need to do to get the situation under control. These actions will make the area safe and minimize any further damage while you figure out your next move.
Shut Off the Power and Water
Your first priority is safety. Start by cutting the power to your water heater. If you have an electric model, head to your home’s breaker box and flip the switch connected to the unit. For a gas water heater, you’ll find a dial or switch on the gas control valve, usually near the bottom of the tank; turn it to the “OFF” position. Next, stop the water flow. Look for the cold water supply pipe at the top of the heater and turn its valve clockwise until it’s fully closed. To relieve pressure inside the tank, open a hot water faucet at a nearby sink or tub and let it run for a minute.
Drain the Tank Safely
If the leak is more than a slow drip, draining the tank is the best way to prevent widespread water damage. Find the drain valve near the bottom of the water heater and connect a standard garden hose to it. Run the other end of the hose to a floor drain, a bathtub, or outside your home, making sure it’s positioned downhill so gravity can do the work. Once the hose is secure, open the drain valve. If you’re not comfortable with this process or the leak is severe, it’s always best to call for professional residential plumbing assistance. Otherwise, open the pressure relief valve on the tank to let air in, which helps the water drain more quickly.
Document Any Damage
While the tank is draining, grab your phone and start taking pictures. This might seem like a minor step, but it’s incredibly important for any potential insurance or warranty claims. Take clear photos of the leak’s source, the standing water, and any damage to your floors, walls, or personal belongings. Be sure to also get a picture of the manufacturer’s label on the water heater, which contains the model and serial number. This documentation provides a clear record of the incident and gives our technicians valuable information before they even arrive. Once you have everything documented, you can schedule a service call with confidence.
Simple DIY Fixes for a Leaking Inlet
Once you’ve safely shut off the power and water to your heater, you might be able to handle the leak yourself with a few basic tools. Many leaks from the cold water inlet are caused by simple issues that don’t require a complete overhaul. These fixes are great starting points for any homeowner looking to solve the problem quickly. Remember to work carefully and methodically. If at any point you feel unsure or the leak seems to get worse, it’s always best to stop and call for professional help. For many homeowners in Tucson, a small adjustment is all it takes to get things back in working order. But if these steps don’t resolve the issue, our team is always ready to provide expert residential plumbing services.
Tighten Loose Connections
Over time, the vibrations from water flowing through your pipes can cause fittings to loosen. This is one of the most frequent and easily fixed reasons for a leak at the cold water inlet. Before you do anything else, grab a pipe wrench and check the connection where the cold water line enters the tank. Gently try to tighten the fitting. The key word here is gently. You only need to snug it up a bit. Over-tightening the connection can strip the threads or crack the pipe, turning a small drip into a much bigger problem. If a slight turn stops the leak, you’ve likely found your culprit.
Replace Worn Washers and O-Rings
If tightening the connection didn’t work, the next thing to check is the small rubber parts inside the fitting. The washer or O-ring that creates the seal can become brittle, crack, or wear out over the years, allowing water to seep through. You can find replacements at any hardware store. To replace it, you’ll need to disconnect the water line completely. Once it’s off, inspect the old washer for any signs of damage. If it looks worn, simply swap it out for a new one and reconnect the pipe. Be aware that if the leak appears to be coming from the pipe threads themselves, it could signal a more serious issue with the tank, especially in units over 10 years old.
Apply Plumber’s Tape to Threads
For leaks that seem to originate from the threaded part of the connection, plumber’s tape (also known as Teflon tape) can be a great solution. This thin tape helps create a stronger, more watertight seal between the pipe and the tank inlet. You’ll need to shut off the water and disconnect the cold water supply line. After cleaning and drying the threads on the nipple, wrap them with a few layers of plumber’s tape in a clockwise direction. This ensures the tape doesn’t unravel as you tighten the fitting. Once wrapped, you can re-screw the connector and restore the water supply to check for leaks.
When to Call a Professional Plumber
There’s a lot of satisfaction in fixing something yourself, but some jobs are best left to the experts. When it comes to water heaters, a small mistake can lead to a much bigger, more expensive problem. If you’ve tried the simple fixes and are still dealing with a leak, or if you’re just not comfortable handling the repair, it’s time to call for professional help. A licensed plumber can accurately diagnose the issue, ensure the repair is done safely, and save you from potential water damage down the road.
Your DIY Fix Doesn’t Work
You’ve tightened the connections, replaced the washer, and applied plumber’s tape, but that pesky drip is still there. If your best DIY efforts haven’t stopped the leak, it’s a strong sign that the problem is more complex than it appears. Homeowners often find that persistent leaks indicate a deeper issue within the tank itself, like internal corrosion. Instead of spending more time and money on fixes that don’t last, this is the perfect moment to bring in a professional plumber. We can identify the true source of the leak and provide a lasting solution.
You See Major Warning Signs
Some symptoms are too serious to ignore. If you notice any of the following red flags, it’s crucial to stop what you’re doing and call for help immediately. Be on the lookout for rust forming on top of the tank or around the valves, as this points to corrosion. Another major warning sign is a temperature and pressure (T&P) relief valve that constantly leaks water. For gas heaters, the smell of gas is an emergency that requires immediate attention. Similarly, if your hot water is coming out rusty, it’s a clear indicator of tank decay. Don’t wait for these issues to get worse; schedule a service call right away.
Your Water Heater Is Old
Age is a major factor in your water heater’s performance and reliability. Most tank-style water heaters have a lifespan of about 8 to 12 years. If your unit is in that age range or older and has started leaking, a repair might just be a temporary patch. An older tank is much more likely to have significant internal corrosion, which can’t be fixed. Pouring money into repairing an aging unit often isn’t cost-effective. A professional can assess its condition and help you decide if a full water heater replacement is the smarter long-term investment for your home in Tucson or Marana.
Repair or Replace? How to Decide
Deciding whether to fix a leaking water heater or invest in a new one can feel like a tough call. You want to make the most cost-effective choice without setting yourself up for more headaches down the road. The good news is that a few key factors can make the decision much clearer. By looking at your water heater’s age, the cost of the repair, and how often you’re dealing with problems, you can figure out the best path forward for your home and your budget.
Consider the Age and Condition
The first thing to check is your water heater’s age. Most standard tank water heaters last about 8 to 12 years. If yours is pushing past the 10-year mark and starting to leak, replacement is often the wisest choice. An older tank is more likely to have internal corrosion that will only lead to more leaks. For example, if you see water coming from the threads where the cold water inlet pipe connects to the tank, it could mean the tank itself is failing, especially on an older unit. Continuing to repair an aging water heater can be a losing battle that costs you more in the long run.
Compare Repair vs. Replacement Costs
Next, let’s talk numbers. A simple fix, like tightening a loose connection, might not cost much. However, more involved repairs, like replacing a valve, can start to add up. If you get a quote for a repair that costs a significant fraction of a new water heater, it’s time to pause. As a general rule, if the repair cost is 50% or more of the price of a new unit, replacement is the better long-term investment. Our team can give you a clear breakdown of your options for water heater services to help you compare the costs and make an informed decision.
Note the Frequency of Leaks
Is this the first time your water heater has leaked, or does it feel like you’re constantly cleaning up puddles? A one-time, minor leak might be an easy fix. But if you’re dealing with recurring leaks, it’s a strong signal that your water heater is on its last legs. Frequent problems, even small ones, often mean the internal components are wearing out. Instead of paying for repeated service calls, putting that money toward a new, reliable water heater will save you stress and money over time. If you’re facing persistent issues, it’s a good idea to schedule an inspection with a professional.
How to Prevent Future Leaks
After you’ve fixed the immediate leak, the last thing you want is a repeat performance. A little proactive care can go a long way in preventing future headaches and protecting your home from water damage. By paying attention to a few key areas of your water heater’s health, you can extend its lifespan and keep it running efficiently. It’s all about shifting from reactive repairs to a preventative mindset. Here are the three most effective ways to keep your water heater in top shape and avoid another unwelcome surprise.
Schedule Annual Maintenance
Think of annual maintenance as a wellness check for your water heater. Having a professional inspect your unit once a year is the best way to catch potential problems before they escalate into a full-blown leak. During a visit, a technician can spot early signs of corrosion, test the pressure relief valve, and ensure all connections are secure. This simple step not only helps prevent leaks but also keeps your system running efficiently, which can save you money on energy bills. Signing up for a maintenance agreement can make this even easier, ensuring you never miss a crucial check-up.
Flush the Tank and Replace the Anode Rod
Over time, sediment like minerals and sand can settle at the bottom of your water heater tank. This buildup can cause the tank to corrode from the inside out and force the system to work harder, leading to inefficiency and leaks. Flushing the tank annually removes this sediment. Just as important is the anode rod, a metal rod inside the tank that attracts corrosive elements, essentially sacrificing itself to protect the tank lining. A professional plumber can replace this rod every three to five years to significantly extend the life of your water heater and prevent rust-related leaks.
Monitor Your Home’s Water Pressure
Your home’s water pressure might not be something you think about often, but it directly impacts your water heater. If the pressure is too high, it puts constant stress on the tank, pipes, and connections, making leaks much more likely. Ideally, your home’s water pressure should be between 40 and 60 psi. You can buy a simple gauge at a hardware store to test it yourself, or you can have a plumber check it during a maintenance visit. If the pressure is too high, a professional can install a pressure-reducing valve to protect your entire plumbing system from unnecessary strain.
Related Articles
- Water Heater Leaking? Your Step-by-Step Guide
- Water Heater Leaking? Here’s What to Do Right Now
- Hot Water Heater Leaking From Overflow Pipe? 5 Fixes
- Leaking Water Heater? An Emergency Step-by-Step Guide
- Electric Water Heater Leaking From Bottom? What to Do
Frequently Asked Questions
Is a small leak from my water heater really an emergency? Even a slow drip shouldn’t be ignored. While it might not seem urgent, that constant moisture can lead to serious problems like water damage to your floors, mold growth, and wood rot. A small leak is also often a warning sign that a bigger issue, like tank corrosion, is developing. It’s always best to address it right away to prevent a minor inconvenience from becoming a major, expensive repair.
How can I tell if the leak is a simple fix or a sign of a bigger problem? A good way to tell is by looking closely at where the water is coming from and checking for rust. If the drip is coming directly from a pipe fitting, it might just be a loose connection that needs tightening. However, if you see rust streaks on the side of the tank, bubbling paint, or water seeping from the tank itself (not a pipe), it almost always means the tank has corroded internally and needs to be replaced.
My water heater is over 10 years old. Should I even bother with a repair? When a water heater is more than a decade old, a leak is often the first sign that it’s nearing the end of its life. While a simple repair might fix the immediate problem, it’s likely that other components are also worn out. Investing in a repair for an older unit can be a short-term solution that leads to more service calls down the road. In most cases, replacing an aging, leaking water heater is the more reliable and cost-effective choice.
What is an anode rod and why is it so important for preventing leaks? Think of the anode rod as a bodyguard for your water heater tank. It’s a metal rod made of aluminum or magnesium that hangs inside the tank. It’s designed to attract and corrode before the steel tank does, essentially sacrificing itself to prevent rust. Once the anode rod is completely worn away, the tank itself will start to rust, which is a primary cause of leaks. Having it checked and replaced every few years is a key part of preventative maintenance.
If I shut off the water to the heater, can I still use cold water in my house? Yes, you absolutely can. The shut-off valve for your water heater only controls the cold water supply line going into the tank. Closing this valve will stop water from entering the heater, but it won’t affect the cold water supply to your sinks, showers, or toilets. You’ll be able to use cold water throughout your home as usual while you wait for the repair.


