
Here in Tucson, our notoriously hard water can be tough on our home’s appliances, and your water heater is no exception. Over time, mineral and sediment buildup can lead to corrosion and damage, making a water heater leaking a common issue for local homeowners. As your local plumbing experts, we understand the specific challenges our water supply presents. This guide is designed to help our neighbors identify the signs of a leak, understand the common causes related to our region—like sediment damage and high water pressure—and learn the best ways to prevent future problems and protect their investment.
Key Takeaways
- Act Fast to Ensure Safety: If you find a leak, immediately shut off the power and water supply to your water heater. This critical first step prevents electrical hazards and minimizes water damage while you assess the situation.
- Identify the Source to Know Your Options: A leak from a pipe or valve can often be repaired, but water coming from the tank itself usually means it’s time for a replacement. Pinpointing the origin helps you make a smart financial decision.
- Invest in Prevention with Annual Maintenance: The most effective way to avoid future leaks is through regular professional service. An annual inspection and tank flush can catch small issues early and significantly extend your water heater’s lifespan.
Why Is My Water Heater Leaking?
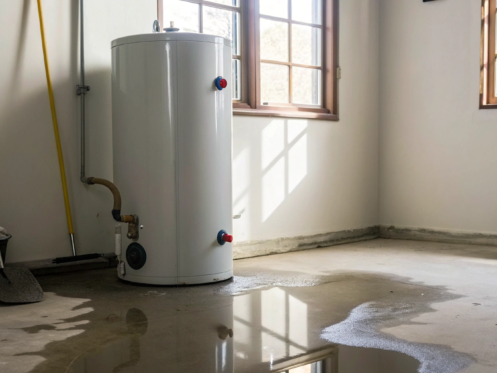
Discovering a puddle around your water heater is never a welcome sight, but it’s a problem you can tackle with a clear head. A leak doesn’t always mean you need a brand-new unit. Often, the cause is a simple, fixable issue. From loose pipes to a worn-out tank, several things could be going on. Understanding the potential sources of the leak is the first step toward finding the right solution and preventing a small drip from turning into a major headache. Let’s walk through the most common culprits so you can get a better idea of what you’re dealing with and what your next steps should be.
Loose Pipe Connections
The first place you’ll want to check is the top of your water heater. The cold water inlet and hot water outlet pipes can sometimes loosen over time due to small vibrations and temperature changes. This can cause a slow drip that runs down the side of the tank, making it look like the tank itself is leaking. Take a close look at these connection points. If you see water beading up or dripping from the fittings, a loose connection is likely your problem. Sometimes, a simple tightening with a wrench is all it takes to solve the issue.
A Faulty Temperature and Pressure (T&P) Valve
Every water heater has a T&P valve on the side or top, which is a critical safety feature designed to release pressure if it builds up too high inside the tank. If you notice water leaking from this valve, it could mean one of two things: either the valve itself is faulty and needs to be replaced, or it’s doing its job because of excessive pressure or temperature in the tank. A leaking T&P valve is a sign you shouldn’t ignore, as it could point to a more serious underlying problem that needs immediate attention from a professional.
A Corroded Drain Valve
At the bottom of your water heater, you’ll find a drain valve that’s used to empty the tank for maintenance or replacement. Over time, this valve can corrode, wear out, or fail to seal completely after being used. This often results in a slow, persistent drip that pools on the floor. If the leak seems to be coming directly from this spigot-like valve, it might be time for a replacement. While replacing a drain valve is a relatively straightforward job, it does require draining the entire tank first.
Damage from Sediment Buildup
Here in Arizona, we have notoriously hard water, which is full of minerals like calcium and magnesium. These minerals can settle at the bottom of your water heater tank, creating a layer of sediment. This buildup forces your water heater to work harder to heat the water, which can cause the tank to overheat and weaken. Over time, this can lead to cracks and corrosion from the inside out, resulting in a leak. Regular flushing as part of a maintenance agreement is the best way to prevent this kind of damage.
Excessive Water Pressure
Your home’s water pressure might be higher than you think. While strong water pressure is great for showers, if it’s too high, it puts constant strain on your entire plumbing system, including your water heater. This excessive pressure can stress the tank’s seams and connections, eventually causing them to fail and leak. If you suspect high water pressure is the issue, a plumber can test it and install a pressure-reducing valve to protect your appliances and prevent future leaks throughout your home. This is a common issue in many neighborhoods, but it’s one that’s easily managed with the right equipment.
An Old, Deteriorating Tank
Unfortunately, water heaters don’t last forever. The average lifespan is about 8 to 12 years. As the unit ages, the inner tank can begin to rust and corrode. Eventually, this corrosion can eat through the steel, causing a leak that can’t be repaired. If your water heater is getting up there in age and you see water seeping from the bottom of the tank jacket, it’s a strong sign that the tank itself has failed. In this situation, a full replacement is the only solution. Our team is always ready to help with any residential plumbing needs, including water heater replacement.
How to Find the Source of the Leak
Once you’ve safely shut off the power and water to your unit, it’s time to play detective. Finding where the water is coming from is the first step toward figuring out how serious the problem is. Grab a flashlight and start with a systematic check of the most common culprits. Most leaks originate from one of a few key areas on the water heater. By carefully inspecting the unit from top to bottom, you can often pinpoint the source yourself. This will give you valuable information to share when you call a professional for help.
Check the Connections on Top
Start your inspection at the very top of the water heater. This is where the cold water inlet and hot water outlet pipes connect to the tank. Over time, these pipe connections can loosen due to vibrations and temperature changes, causing drips. Carefully feel around the fittings for any moisture. Sometimes, a simple tightening with a wrench is all that’s needed to stop the leak. However, if the pipes themselves are corroded or cracked, you’re looking at a more involved repair. Our team handles these kinds of residential plumbing issues every day, ensuring connections are secure and leak-free.
Inspect the Valve on the Side
Next, move your attention to the side of the tank to find the temperature and pressure (T&P) relief valve. This crucial safety device is designed to release water if the temperature or pressure inside the tank gets too high. If you see water dripping from the T&P valve or its discharge pipe, it could be a sign of a serious problem. It might mean the valve itself is faulty, or it could indicate that your water heater is experiencing excessive pressure. Don’t ignore this; it’s a warning sign that needs professional attention to prevent a much bigger problem.
Examine the Drain Valve at the Bottom
At the base of your water heater, you’ll find a drain valve that looks like a regular spigot. This valve is used to empty the tank for maintenance. If you notice a slow drip or a steady stream coming from here, the valve might not be fully closed or its washer could be worn out. Sometimes, sediment from inside the tank gets caught in the valve, preventing it from sealing properly. While replacing a drain valve can be a straightforward job, it does require draining the entire tank first. If you’re not comfortable with that, it’s best to schedule a professional to handle it.
Look for Cracks in the Tank
The most serious cause of a leak is a crack in the internal tank itself. If you see water seeping from the bottom of the outer jacket or pooling on the floor with no obvious source from the valves or pipes, it’s likely the tank has failed. This is usually caused by internal rust and corrosion that has eaten through the steel. Unfortunately, a cracked tank cannot be repaired. This is a clear sign that your water heater has reached the end of its life and you will need a full replacement.
Is It a Leak or Just Condensation?
Before you panic, make sure you’re dealing with a leak and not just condensation. Condensation can form on the outside of the tank, especially during colder months or when you’ve just used a large amount of hot water, causing the tank to refill with cold water. This moisture typically looks like small beads of water on the surface and should disappear as the heater warms up. To check, wipe the area dry with a towel and come back in an hour. If the moisture has returned, you likely have a slow leak. If it’s still dry, it was probably just condensation.
What to Do the Moment You Find a Leak
Finding a puddle around your water heater can definitely cause a moment of panic. But taking a deep breath and acting quickly can make all the difference in preventing a small issue from becoming a major disaster. By following a few key steps, you can safely manage the situation until a professional arrives. Think of it as your emergency action plan—a clear, simple checklist to protect your home and your family. These actions are designed to minimize water damage, ensure your safety, and get the situation under control fast. It’s about taking immediate, decisive steps to contain the problem before it escalates. A small leak can quickly saturate drywall, warp flooring, and lead to mold growth if it isn’t addressed right away. By taking these five steps, you’re not just stopping a leak; you’re protecting your home’s structural integrity and your family’s health. Let’s walk through exactly what you need to do to handle a leaking water heater like a pro.
Turn Off the Power
Before you do anything else, your top priority is safety. Water and electricity are a dangerous combination, so you need to cut the power to the unit immediately. If you have an electric water heater, head to your breaker box and flip the switch that controls it. It should be clearly labeled. For a gas water heater, look for a dial or switch on the unit itself, often near the bottom, and turn it to the “Off” position. This simple action prevents the risk of electrical shock and stops the unit from trying to heat an empty or leaking tank, which could cause further damage.
Shut Off the Water
Next, you need to stop more water from flowing into the tank. Look for the cold water inlet pipe, which is usually located on top of your water heater. You’ll find a shutoff valve on this pipe—it might be a lever-style handle or a round, wheel-like one. Turn the valve clockwise until it stops. This will cut off the water supply to the tank, containing the leak and preventing further water from spreading across your floor. If you can’t find this specific valve or it won’t turn, you can shut off the main water supply to your entire house as a temporary measure.
Drain the Tank (If Needed)
If you’re dealing with a significant leak, draining the tank can prevent extensive water damage. Find the drain valve near the bottom of the water heater and attach a standard garden hose to it. Run the other end of the hose to a floor drain or outside, somewhere the water can drain away safely. Then, open a hot water faucet in your home—like in a nearby sink or tub. This allows air to enter the tank, which helps the water drain out smoothly. Be careful, as the water inside could still be very hot, so handle the hose with caution.
Document the Damage for Insurance
While you wait for the tank to drain or for help to arrive, use your phone to take clear photos and videos. Document the source of the leak, the water heater itself, and any damage to the surrounding area, including floors, walls, and personal belongings. Even what seems like a minor leak can cause hidden problems over time. Having this visual record is incredibly helpful if you need to file a homeowner’s insurance claim. It provides clear proof of the incident and the extent of the damage, making the claims process much smoother.
Call a Professional Plumber
You’ve successfully managed the immediate emergency—now it’s time to call in an expert. A leaking water heater isn’t a DIY project, as it requires a professional to diagnose the problem correctly and perform a safe, lasting repair. Whether it’s a faulty valve or a corroded tank, a licensed technician has the tools and experience to fix it right. Don’t wait to get it looked at. You can schedule an appointment online with our team 24/7 to get a certified plumber on the way to restore your hot water and your peace of mind.
Is a Leaking Water Heater Dangerous?
A leaking water heater is more than just a puddle on the floor—it’s a serious issue that can pose significant risks to your home and family. While it might start as a slow drip, ignoring it can lead to costly water damage, dangerous electrical hazards, and even unhealthy living conditions. The moment you spot a leak, it’s important to understand the potential dangers and act quickly. From structural damage to the risk of pressure buildup, a leak is your water heater’s way of telling you it needs immediate attention. Taking the right steps can protect your property and ensure your home remains a safe, comfortable space.
The Risk of Water and Structural Damage
Even a tiny leak can cause a surprising amount of damage. Water can seep into your subflooring, drywall, and insulation, compromising the structural integrity of your home over time. What starts as a small, damp spot can quickly ruin floors and walls, leading to expensive repairs. This is especially true for slow leaks that go unnoticed for days or weeks. The longer water is allowed to sit, the more extensive the damage becomes. That’s why addressing any signs of a leak is a critical part of home maintenance and our approach to residential plumbing.
Electrical Shock Hazards
If you have an electric water heater, a leak introduces a serious risk of electrical shock. Water and electricity are a dangerous combination, and a leak can expose electrical components to moisture, creating a hazardous situation. This is why one of the first steps in handling a leak is to shut off the power to the unit at your circuit breaker. Never touch your water heater or stand in pooling water if you suspect a leak. Your safety is the top priority, and handling potential electrical hazards is a job best left to a trained professional.
The Danger of Extreme Pressure Buildup
One of the most critical components of your water heater is the temperature and pressure (T&P) relief valve. If this valve is leaking, it could be a sign that the pressure inside the tank has reached unsafe levels. In a worst-case scenario, excessive pressure buildup can cause the tank to rupture or even explode. A leaking T&P valve is a major warning sign that your unit is malfunctioning and needs immediate professional inspection. If you notice this, don’t wait—schedule an appointment online with a certified plumber right away.
Mold Growth and Health Risks
Beyond the immediate water damage, a persistent leak creates the perfect damp environment for mold and mildew to grow. Mold can thrive in hidden areas like behind walls, under carpets, or within your home’s insulation, often before you can even see it. Mold growth not only causes further damage to your home but can also pose health risks, triggering allergies and respiratory issues for your family. A simple plumbing leak can quickly become a much larger problem that affects your home’s air quality and your family’s well-being, making a swift repair essential.
Can I Fix a Leaking Water Heater Myself?
When you spot a puddle under your water heater, your first instinct might be to grab a wrench and tackle the problem yourself. And for some very minor issues, a little DIY can be effective. However, water heaters combine water, high pressure, and either electricity or gas, which can be a dangerous mix if you’re not sure what you’re doing. The key is knowing the difference between a simple fix and a serious problem that needs an expert’s touch. Before you attempt any repair, your absolute first step should be ensuring your own safety.
Simple DIY Fixes for Minor Leaks
If you’re comfortable with basic home repairs, a few issues can sometimes be resolved without a professional. Start by looking at the pipe fittings on the top and sides of the tank—a loose connection might just need to be gently tightened with a wrench. Another common culprit is the temperature and pressure (T&P) valve. Mineral buildup can sometimes cause it to drip. You can try carefully lifting the lever and letting it snap shut a few times to clear any debris. If the leak is coming from the drain valve at the bottom, you might be able to replace it if it’s a simple screw-on type. These fixes are only for small, slow drips from specific fittings, not for leaks coming from the tank itself.
Know When to Call a Pro
It’s time to put down the tools and pick up the phone if your simple fix doesn’t work or if the problem seems more complicated. If you’ve tightened a connection and it still drips, or if the T&P valve continues to leak after you’ve tried clearing it, it’s a sign of a bigger issue like excessive pressure or a faulty part. Any leak coming from the actual tank body is a red flag that usually means the unit is failing and needs to be replaced. For your safety and a lasting solution, it’s always best to have a professional diagnose the problem. Our team can pinpoint the exact cause and let you know the safest, most effective way to fix it. You can schedule an appointment online with one of our certified technicians.
Safety First: Precautions for Any DIY Attempt
Before you even think about touching your water heater, you need to take two critical safety steps. First, shut off the power. For an electric heater, go to your circuit breaker and flip the switch connected to the unit. For a gas heater, turn the thermostat knob to the “Off” position and close the nearby gas shut-off valve. The second step is to turn off the water supply to the tank, which is usually a valve on the cold water pipe leading into the heater. These steps are non-negotiable. They protect you from the serious risks of electrical shock and prevent the tank from refilling and causing more water damage while you work.
Should I Repair or Replace My Water Heater?
When you’re dealing with a leaking water heater, the big question is whether to fix it or get a new one. It’s a significant decision, and the right answer depends on a few key factors. Walking through them can help you make a smart choice that saves you money and stress in the long run. Let’s look at what you need to consider to decide if a repair will do the trick or if it’s time for a full replacement.
Consider Its Age and Condition
The first thing to check is your water heater’s age. Most traditional tank water heaters last between 8 and 12 years, while tankless models can last up to 20. If your unit is nearing the end of its typical lifespan, investing in a major repair might not be the best use of your money. Parts wear out over time, and an older unit that starts leaking is often signaling that it’s on its last legs. A new water heater can provide peace of mind and reliable performance for years to come, making it a wiser investment than patching up an aging system.
Compare Repair vs. Replacement Costs
Next, it’s time to do the math. Get a professional quote for the repair and compare it to the cost of a new installation. A good rule of thumb is the 50% rule: if the repair costs 50% or more than the price of a new unit, replacement is almost always the better financial decision. This is especially true for major issues. For example, if the storage tank is cracked and leaking, it cannot be repaired and must be replaced immediately to prevent serious water damage to your home.
Think About Long-Term Energy Efficiency
A leaking water heater isn’t just a plumbing problem; it’s an efficiency problem. Leaks can force the unit to work harder and run longer to heat your water, leading to a noticeable spike in your energy bills. Modern water heaters are far more energy-efficient than models from a decade ago. Upgrading to a new, high-efficiency unit can lower your monthly utility costs, meaning the replacement will eventually start to pay for itself. When you schedule a consultation, a professional can help you find a model that fits your home’s needs and your budget.
How Often Has It Needed Repairs?
Think about your water heater’s track record. Is this the first time it’s had an issue, or have you been calling a plumber for frequent fixes? If you’re constantly dealing with breakdowns, you’re throwing money at a failing system. Those repeated repair bills can add up quickly and could be better spent on a new, dependable water heater. A unit that needs constant attention is unreliable and likely to fail completely when you least expect it. Investing in a replacement ends the cycle of repairs and gives you consistent, worry-free hot water.
Assess the Severity of the Leak
Not all leaks are created equal. If water is dripping from a pipe connection or the temperature and pressure relief valve, it might be a relatively simple and inexpensive fix. However, if you see water pooling at the bottom of the unit, it’s a major red flag. This often indicates that the inner tank has corroded and rusted through, which is a fatal flaw. A leaking tank is a clear sign that your water heater needs to be replaced right away. Ignoring it can lead to a burst tank and catastrophic water damage.
What Does Water Heater Repair Usually Cost?
When you’re dealing with a leaking water heater, one of the first questions that comes to mind is, “How much is this going to set me back?” The answer isn’t always straightforward, as the final cost depends on what’s causing the leak and the extent of the damage. A simple fix might only cost a couple hundred dollars, while a major problem could lead to a full replacement.
Understanding the potential costs can help you prepare financially and make an informed decision. Think of it like this: a dripping faucet is a much different problem than a burst pipe. The same logic applies to your water heater. A small, contained leak from a valve is a world away from a crack in the tank itself. Let’s break down the typical costs for minor repairs versus a full replacement and the factors that can influence your final bill.
The Price of Minor Repairs
If you’ve caught the leak early and the cause is a relatively simple component failure, you can breathe a little easier. Minor repairs typically range from $100 to $350. These fixes often involve replacing parts like a faulty thermostat, a worn-out heating element, or a leaky drain valve. Tasks like flushing the tank to clear out sediment also fall into this category. These are common wear-and-tear issues that a professional plumber can usually resolve quickly, keeping labor costs down. So, if you’re dealing with a small, steady drip, it might not be a budget-breaker.
The Investment for a Full Replacement
On the other hand, if the problem is a corroded or cracked tank, you’re likely looking at a full replacement. While some major repairs can average around $600, the cost to install a brand-new water heater can range from $400 to over $800, depending on the model you choose. The total cost for a full replacement varies widely based on the type of unit and installation needs. This is a significant investment, but it’s often the only safe and effective solution for a failing tank. When you get a quote, make sure it includes the new unit, installation labor, and disposal of your old water heater.
Factors That Influence the Final Cost
Several variables can affect the final price of your water heater repair. The type of water heater you have—whether it’s a traditional tank, a tankless model, gas, or electric—plays a big role. The complexity of the repair is another key factor; a hard-to-reach unit will require more labor. The cost of any necessary parts and local labor rates will also be part of the equation. Because so many factors are at play, the best course of action is to have a professional diagnose the problem. A qualified technician can give you a detailed estimate for your specific residential plumbing needs.
How to Prevent Future Water Heater Leaks
Dealing with a leaking water heater is a stressful, messy ordeal. The good news is that you can significantly reduce the chances of it happening again. A little proactive care goes a long way in protecting your home and your wallet from unexpected water damage. Think of your water heater like your car—it needs regular check-ups to run smoothly and last as long as possible. By adopting a few simple maintenance habits, you can extend its lifespan, improve its efficiency, and gain peace of mind knowing you’ve taken steps to prevent a future flood in your basement or garage. These preventative measures are straightforward and are the best defense against the most common causes of water heater failure.
Schedule Regular Maintenance
The single best thing you can do for your water heater is to keep up with regular maintenance. Your owner’s manual will have a recommended schedule, and following it is key. Consistent upkeep not only helps your heater work more efficiently (which can save you money on energy bills) but also keeps your warranty valid. Most importantly, it helps your unit last longer, delaying the need for a costly replacement. If you prefer a hands-off approach, consider signing up for a maintenance agreement. This way, you don’t have to remember when service is due—a professional handles it for you, ensuring everything stays in top condition year after year.
Get Annual Professional Inspections
While some maintenance tasks are simple, nothing beats a trained eye. An annual professional inspection is crucial for catching small problems before they become major disasters. During a visit, a technician will perform key checks that homeowners often miss. This includes testing the temperature and pressure (T&P) relief valve to ensure it’s working correctly, inspecting the anode rod—which prevents corrosion—and replacing it if needed. They can also identify early signs of tank deterioration or faulty connections. Scheduling an annual check-up for your residential plumbing system gives you confidence that your water heater is safe and sound.
Monitor Your Home’s Water Pressure
You might not think about your home’s water pressure often, but if it’s too high, it puts constant strain on your entire plumbing system, especially your water heater. Most residential water systems are designed to operate at a pressure below 80 psi. Anything higher can damage your water heater’s tank and connections, leading to leaks. If you notice faucets sputtering or pipes banging, your pressure might be too high. A plumber can test it for you and, if necessary, install a pressure-reducing valve. This simple device can prevent serious damage and extend the life of your unit.
Flush the Tank to Remove Sediment
Over time, minerals like calcium and magnesium naturally present in Tucson’s water supply can settle at the bottom of your water heater tank, creating a layer of sediment. This buildup forces your heater to work harder to warm the water, reducing its efficiency and lifespan. Worse, the sediment can cause the tank to overheat and corrode from the inside out, eventually leading to a leak. Flushing the tank once a year removes this harmful buildup. While it’s a task some homeowners do themselves, it’s also a standard part of professional heating services. An annual flush keeps your water heater running efficiently and protects the tank from premature failure.
Related Articles
- Is Your Water Heater Leaking From the Top?
- Common Issues for Tankless Water Heaters
- How To Know When To Replace The Water Heater
- Do I Need to Replace My Water Heater
Frequently Asked Questions
How can I tell how old my water heater is? You can usually find your water heater’s age by looking at the manufacturer’s sticker on the side of the tank. Find the serial number, which often contains the manufacturing date coded within it. The format varies by brand, but a quick search online for your specific brand’s serial number format will show you how to read it. Knowing the age is a great first step in deciding whether a repair or replacement makes more sense.
Is a small, slow drip really that urgent? Yes, you should treat any leak as an urgent issue. That small drip is a clear sign that something is wrong, and it won’t fix itself. Over time, even a little water can cause significant damage to your floors and walls, leading to rot and mold. More importantly, a slow drip could be a warning sign of a much bigger problem, like a corroding tank that could fail completely without notice.
My water heater is making a popping sound. Is that related to a leak? It certainly can be. That popping or rumbling noise is often caused by sediment buildup at the bottom of the tank. As the burner heats the tank, water trapped under the sediment boils and creates those sounds. This process puts a lot of stress on the tank’s metal, which can weaken it over time and eventually cause cracks and leaks.
Can’t I just use a commercial sealant to patch a tiny hole in the tank? While it might seem like a quick fix, using a sealant on the tank is not a safe or effective solution. The hole is a symptom of internal corrosion, and the tank is under constant high pressure. A patch won’t hold for long and doesn’t address the underlying issue that the tank’s structure is compromised. This is a situation that always requires a professional assessment to avoid a sudden and messy tank failure.
How long should a water heater last here in Arizona? A standard tank-style water heater typically lasts about 8 to 12 years. However, because of the hard water we have in Tucson and the surrounding areas, that lifespan can sometimes be shorter if the unit isn’t maintained properly. Regular flushing to remove mineral sediment is key to helping your water heater reach and even exceed its expected lifespan.


