
Taking on a home improvement project yourself can be incredibly rewarding, and a water softener system installation is one of those jobs that delivers noticeable benefits every single day. It protects your home’s plumbing, makes your appliances last longer, and even improves the feel of your skin and hair. But let’s be honest, any project that involves cutting into your main water line can feel a bit intimidating. That’s why we created this comprehensive guide. We’ll break down the entire process into clear, manageable steps, covering everything from the tools you’ll need to the common mistakes to avoid, so you can get the job done right and enjoy the perks of soft water.
Key Takeaways
- Plan your project before you start: A successful installation begins with good preparation. Choose a level spot near your main water line with access to a drain and power, test your water hardness to program the unit correctly, and gather all your tools and parts ahead of time.
- Follow the installation steps carefully: The core of the project involves cutting into the main water line, installing the bypass valve, and connecting the drain lines. Pay close attention to creating secure, watertight connections and be sure to program the control valve with your water hardness data for efficient regeneration.
- Know when to call a professional: A DIY approach isn’t for everyone. If you have older or complex plumbing, are unsure about local building codes, or simply feel uncomfortable with the project’s scope, calling a licensed plumber is the smartest choice to ensure the job is done safely and correctly.
What Is a Water Softener and How Does It Work?
If you live in Tucson, you’re probably familiar with the effects of hard water. It’s the reason you see chalky white spots on your dishes and feel a film on your skin after a shower. A water softener is a whole-house filtration system that removes the minerals, primarily calcium and magnesium, that cause this hardness. By treating the water right where it enters your home, a softener protects your pipes, appliances, and even your skin from the constant battle with mineral buildup. Think of it as a gatekeeper for your home’s water supply, ensuring only clean, soft water gets through. Understanding how it works is the first step in deciding if a DIY installation is right for you.
The Problem with Hard Water
So, what exactly is “hard water”? It’s simply water with a high concentration of dissolved minerals. While it’s safe to drink, it can cause a lot of headaches around the house. That limescale buildup you see on your faucets and showerheads can also form inside your pipes, restricting water flow and eventually leading to clogs. It’s also tough on your appliances, reducing the efficiency and lifespan of your water heater, dishwasher, and washing machine. Hard water makes it difficult for soap to lather, leaving behind soap scum on your tubs and a residue on your skin and hair. If you’re tired of spotty glasses and stiff laundry, hard water is likely the culprit affecting your home’s entire plumbing system.
How Ion Exchange Works
The magic behind a water softener is a process called ion exchange. Your home’s water supply is directed into a mineral tank filled with tiny resin beads. These beads are coated in sodium ions. As hard water flows over them, the calcium and magnesium ions (the “hardness” minerals) are attracted to the resin and trade places with the sodium ions. The softened water, now containing a small amount of sodium, continues into your home. Over time, the resin beads become saturated with hardness minerals and need to be cleaned. This is where the regeneration cycle comes in. The system uses a salt solution from the brine tank to flush the minerals off the beads, recharging them with sodium so they’re ready to soften more water.
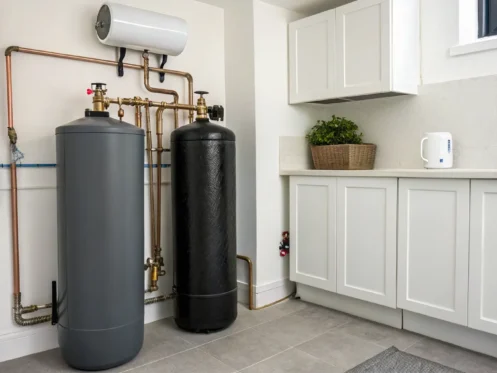
Key Parts of a Water Softener System
Before you can install a water softener, it helps to know its main components. Most modern systems consist of three key parts. First is the mineral tank, a tall, narrow tank where the resin beads live and the ion exchange process takes place. Next is the brine tank, a shorter, wider tank that holds the salt you’ll need to add periodically. This salt dissolves in water to create the brine solution for the regeneration cycle. Finally, there’s the control valve, which sits on top of the mineral tank. This is the brain of the operation, automatically measuring water usage and controlling the regeneration process to keep your system running efficiently. If these parts sound complicated, you can always schedule an appointment with a professional.
Benefits of Installing a Water Softener
If you live in Tucson or surrounding areas like Marana and Sahuarita, you’re likely familiar with the effects of hard water. While installing a water softener is a bit of a project, the rewards are well worth the effort. Tackling hard water at the source improves everything from the lifespan of your appliances to the way your skin and hair feel. It’s one of those home improvements that makes a noticeable difference in your daily life, protecting your home and making it more comfortable. Let’s walk through the specific advantages you can expect once your new system is up and running.
Protect Your Plumbing and Appliances
Hard water is tough on your home. The high concentration of minerals like calcium and magnesium creates limescale buildup inside your pipes, faucets, and water-using appliances. This scale can clog pipes, reduce water pressure, and force your appliances to work harder than they should. A water softener neutralizes these abrasive minerals, preventing scale from forming in the first place. This means your water heater, dishwasher, and washing machine can operate more efficiently and last longer, saving you from premature replacements and costly repairs to your residential plumbing system.
Use Less Soap and Detergent
Have you ever felt like your soap just won’t lather? You can thank hard water for that. The minerals in it react with soap to create a sticky film known as soap scum, which reduces cleaning power. With softened water, you’ll notice an immediate difference. Suds will be abundant, and you’ll find yourself using significantly less soap, shampoo, laundry detergent, and dish soap to get the job done. Not only will this cut down on your shopping bill, but your clothes will come out of the wash looking brighter and feeling softer, and your dishes will be free from those chalky water spots.
Enjoy Softer Skin and Healthier Hair
The same mineral film that builds up in your pipes can also linger on your body. Hard water makes it difficult to rinse away soap completely, leaving a residue that can dry out your skin and leave your hair feeling dull, brittle, and difficult to manage. By removing these minerals, a water softener allows for a clean rinse. Many people find that switching to soft water helps their skin feel smoother and more hydrated and leaves their hair silkier and shinier. It’s a simple change that can make your daily shower feel much more refreshing.
Save Money Over Time
A water softener is an investment that pays for itself in several ways. First, your appliances will last longer and run more efficiently, which means fewer repair calls and lower energy bills. For example, a water heater without scale buildup heats water more effectively, using less energy. Second, you’ll spend less on soaps, detergents, and cleaning products. Over time, these savings really add up. By protecting your home’s major systems, you’re also preserving its value. Combining a water softener with a regular maintenance agreement for your home systems is a smart way to ensure everything runs smoothly for years to come.
Gather Your Tools and Materials for Installation
A successful DIY project starts long before you cut the first pipe. Getting all your tools and materials in one place beforehand saves you from making frantic trips to the hardware store mid-installation. Think of this as your pre-project checklist to ensure everything goes smoothly. When you have everything you need within arm’s reach, you can focus on the task at hand and get the job done right. This preparation is key to a low-stress installation that you can be proud of.
Your Tool Checklist
You probably have most of what you need for this project in your garage or workshop already. Before you start, round up these essential tools. You’ll want an adjustable wrench, a set of screwdrivers, and pliers for tightening fittings and making adjustments. A tape measure and a pipe cutter are crucial for getting your pipes to the perfect length. It’s also smart to have a drill handy for any mounting needs. Finally, don’t forget the basics: a bucket to catch any stray water and some plumber’s tape to create watertight seals on your connections.
Necessary Materials and Parts
Beyond your tools, you’ll need the specific parts for the water softener itself. Obviously, you have your water softener unit, but double-check that you have the correct installation kit, which usually includes essential fittings and hoses. You will also need flexible drain tubing and a drain saddle to properly connect the system to your home’s drainage. Depending on your specific plumbing setup, you might need some extra pipe fittings to make everything connect perfectly. And of course, have plenty of Teflon tape on hand for all threaded connections. It’s also a good idea to keep a few old towels nearby to quickly manage any drips or spills.
Essential Safety Gear
Let’s talk about safety. Any time you’re working with plumbing, it’s important to protect yourself. A simple pair of work gloves will keep your hands clean and safe from sharp edges, while safety goggles are a must for protecting your eyes from unexpected splashes or debris. Taking a moment to put on your safety gear is a small step that makes a big difference. Before you begin, do one last review of your tools and materials against your checklist. This simple habit helps you stay organized and ensures you haven’t missed anything important, letting you proceed with confidence and care.
How to Prepare for Installation
A successful DIY project is all about good preparation. Before you even think about cutting any pipes, taking a little time to plan will save you a lot of headaches later. Getting these foundational steps right ensures your water softener installation goes smoothly and your new system works perfectly from day one. Think of it as setting the stage for a flawless performance. Let’s walk through exactly what you need to do to get ready.
Find the Right Location
Choosing the right spot for your water softener is the first big decision you’ll make. You’ll want to place it as close as possible to where the main water line enters your home, often in a garage, basement, or utility closet. The spot needs to be flat and level, with enough room around the unit so you can easily access it for future maintenance. You’ll also need a standard electrical outlet nearby to power the system and a drain for the regeneration cycle’s discharge water. Picking a good location from the start makes the whole process much simpler.
Test Your Water Hardness
Before you install your system, it’s a good idea to know exactly what you’re dealing with. Testing your water hardness gives you a baseline measurement of the minerals in your water. This is important because that mineral buildup is what causes scale in your pipes and can shorten the life of your appliances. Understanding your water’s specific hardness level helps you program the softener correctly, ensuring it runs efficiently. Over time, this can prevent issues that lead to clogged drains and sewer lines. You can find simple water hardness test kits at most home improvement stores.
Shut Off the Water and Check the Pressure
Safety first! Before you start the installation, you must shut off the main water supply to your house. Find the main shutoff valve and turn it completely off. Then, open a faucet on the lowest level of your home to drain any remaining water from the pipes. It’s also smart to check your home’s water pressure. Water softeners are designed to work within a specific pressure range. If your pressure is too high, you might need to install a pressure-reducing valve to protect the unit. This is a common step in many residential plumbing projects.
Measure and Plan Your Layout
Now it’s time to map everything out. Gather all your tools and parts, making sure the connectors and tubing you have are compatible with your home’s existing pipes, whether they’re copper, PVC, or PEX. Carefully measure the space where the softener will go and plan the layout of the pipes. You want to ensure a clean, seamless fit with your plumbing system. Drawing a simple diagram can be incredibly helpful here. This planning step helps you visualize the connections and confirm you have everything you need before you make the first cut.
Your Step-by-Step Installation Guide
Alright, you’ve got your tools and materials, and you’re ready to get started. Installing a water softener is a project that many homeowners can handle, but it requires careful attention to detail. Think of it like a complex recipe: follow the steps precisely, and you’ll get a great result. This guide breaks down the process into six manageable steps. Remember to work slowly, double-check your connections, and never hesitate to pause if you feel unsure. The goal is a leak-free system that gives you soft water for years to come, not a weekend plumbing emergency.
Step 1: Cut Into the Main Water Line
This is the moment of truth. First, and most importantly, shut off the main water supply to your house and drain the pipes by opening a faucet on the lowest level. Once the water is off, you’ll need to cut into the main water line where you plan to install the softener. A pipe cutter will give you the cleanest cut. According to a helpful DIY guide, you need to leave enough space between the two cut ends to fit the water softener’s bypass valve. This step can be intimidating, and if cutting into your home’s main water supply feels like too much, it’s a perfect time to call in a professional for residential plumbing services.
Step 2: Install the Bypass Valve
The bypass valve is a critical component that allows you to shut off water to the softener for maintenance without cutting off water to your entire home. Some models come with one built-in, but if yours doesn’t, you’ll need to install it now. You’ll connect the valve to the two cut ends of the main water line. This usually involves cleaning the pipe ends, applying flux, and soldering copper fittings or using compression fittings. As experts at Aquasana explain, ensuring these connections are secure and watertight is essential to prevent leaks down the road. Take your time to get a perfect fit.
Step 3: Connect the Mineral Tank and Control Valve
Now it’s time to bring in the main equipment. Position the mineral tank and connect it to the bypass valve. You can use either rigid copper pipes or flexible connector hoses for this part. Flexible hoses are often easier for DIY installations as they don’t require perfect alignment. Attach the control valve, which is the electronic head unit, to the top of the mineral tank. This valve directs the flow of water for softening and regeneration. Make sure the distributor tube is properly seated inside the tank before tightening the control valve down.
Step 4: Set Up the Brine Tank and Drain Line
The brine tank is where the magic of regeneration happens. Place it next to the mineral tank and connect the two using the small brine tube provided. Next, you’ll run the drain hose from the control valve to a suitable drain, like a floor drain or utility sink. It’s important to secure this hose and leave an air gap to prevent wastewater from siphoning back into your system. Finally, add the salt pellets or crystals to the brine tank according to the manufacturer’s instructions. A proper setup is key for managing your home’s drains and sewer system effectively.
Step 5: Program the Regeneration Cycle
With all the physical connections made, you can plug in the control valve and bring your system to life. This is where you’ll program the unit to match your household’s needs. You’ll need to input your water hardness level (which you tested earlier), the time of day, and the number of people in your home. This information allows the softener to calculate the regeneration cycle correctly, ensuring it cleans itself at the right time (usually overnight) without wasting salt or water. Refer to your owner’s manual for specific instructions on programming your model.
Step 6: Test the System
You’re at the finish line! Before you turn the water back on, double-check every single connection you made. Once you’re confident everything is tight, slowly open the main water valve just a little to let the pipes fill gradually. Put the bypass valve in the “service” position to direct water into the softener. Watch and listen carefully for any drips or leaks. If everything stays dry, open the main valve all the way. Let the system run through a manual regeneration cycle to make sure it’s working properly. If you spot any issues, it’s always best to be safe and schedule online with an expert.
Common Installation Mistakes to Avoid
Even the most carefully planned DIY project can hit a snag. When it comes to installing a water softener, a few common errors can turn a rewarding weekend task into a major headache. By knowing what to watch out for, you can ensure your installation goes smoothly and your new system works perfectly from day one. Let’s walk through the mistakes that homeowners often make so you can steer clear of them.
Choosing the Wrong Size or Location
Getting the size and placement right is the foundation of a successful installation. A water softener that’s too small for your home won’t be able to keep up with your water usage, leaving you with hard water. One that’s too large will waste salt and water during regeneration cycles, costing you money. Before you buy, calculate your household’s daily water consumption and test your water’s hardness level to find the right capacity.
Placement is just as important. Your softener needs to be installed near where the main water line enters your home, close to a power outlet, and with access to a drain. Choosing an inconvenient or improper location can make the installation much more difficult and could even affect the system’s performance.
Mishandling Drain and Electrical Connections
Your water softener needs to flush out the collected minerals during its regeneration cycle, which requires a proper drainage setup. One of the most serious installation mistakes is failing to correctly connect the drain line. An improper connection can lead to leaks, backflow, or even significant water damage in your home. Always follow the manufacturer’s instructions for creating an air gap and securing the line. Similarly, ensure any electrical connections are handled safely and according to code to prevent hazards. If you have any doubts about your home’s plumbing system, it’s always best to pause and consult an expert.
Forgetting Key Programming Steps
Once all the pipes are connected, it’s tempting to call the job done. However, you still need to program the control valve. This is the brain of your water softener, and it needs the right information to work efficiently. You’ll have to input your water hardness level, the number of people in your household, and the desired regeneration schedule. Skipping this step or entering incorrect information means the system won’t regenerate at the right times. This can lead to either hard water making its way through or wasted salt and water from regenerating too often. Take a few extra minutes to program it correctly; it will save you a lot of frustration later.
Believing Common DIY Myths
The internet is full of conflicting advice, and it’s easy to get led astray. One common myth is that water softener installation is always a simple, one-size-fits-all project. While many homeowners can successfully complete the installation, it’s not the right fit for everyone. If you have older pipes, a complex plumbing layout, or are simply not comfortable cutting into your main water line, a DIY approach might not be the best choice. Don’t feel pressured to do it all yourself. Knowing your limits and choosing to schedule a professional plumber is often the smartest and safest decision you can make for your home.
Know When to Call a Professional Plumber in Tucson
Taking on a DIY project like a water softener installation is a great way to save money and learn more about your home. But even the most confident DIYer knows there are times when calling in a professional is the smartest move. Plumbing projects can get complicated quickly, and a small mistake can lead to big, expensive problems. If you’re working on your home in Tucson or the surrounding areas, knowing when to tag in an expert can save you time, stress, and potential water damage.
Recognizing the limits of a DIY project isn’t a failure; it’s a sign of a savvy homeowner. Certain situations, especially with plumbing, require specialized tools and a deep understanding of local regulations. Before you find yourself in over your head, let’s walk through a few scenarios where calling a licensed plumber is your best bet. It ensures the job is done right the first time, protecting your home and your investment in a new water softener system.
Your Home Has Complex or Older Plumbing
If you live in an older home in areas like Oro Valley or Oracle Foothills, your plumbing system might have some quirks. Pipes could be made from outdated materials or have a non-standard layout that makes a straightforward installation much more complex. A professional plumber has the experience to handle these unique challenges. They can assess your existing residential plumbing and make sure your new water softener integrates seamlessly. Installing an incorrectly sized unit can lead to poor water quality or wasted salt and water, but an expert will ensure your system is perfectly matched to your home’s specific needs and your family’s water usage.
You Need Help with Local Codes and Permits
Most significant plumbing work requires adherence to local building codes, and sometimes, it even requires a permit. These regulations are in place to ensure safety and proper function, but they can be a hassle to understand if you’re not a professional. A licensed plumber in Tucson is familiar with all the local requirements and will handle the permitting process for you. Getting it wrong could mean failing an inspection or, worse, having to redo the work. For example, an improper installation could force you to shut off all the water in your home just to make a future repair, a major inconvenience that following code helps prevent.
Warning Signs You Need an Expert
Sometimes you don’t know you need help until you’ve already started. If you run into any of these issues, it’s a good time to pause and call for backup. For instance, water softeners need to operate within a specific water pressure range. A professional will test your pressure and install a regulator if needed to protect your new appliance. You might also run into logistical problems, like finding you don’t have enough space for the unit or discovering your slab foundation makes running the necessary lines a major challenge. If you encounter any of these red flags, it’s wise to schedule an appointment with an expert who can get the job done safely and correctly.
Related Articles
Frequently Asked Questions
How often will I need to add salt to my water softener? This really depends on your water hardness and how much water your household uses. A typical family might add salt every six to eight weeks. The good news is that most modern systems are very efficient, and you can simply check the brine tank once a month. When the salt level gets low, just top it off. It’s a simple maintenance step that keeps your system running smoothly.
Will the softened water make my drinking water taste salty? This is a very common concern, but the answer is no. The ion exchange process adds a tiny amount of sodium to the water, not salt (sodium chloride). The amount is so small that most people can’t taste it at all. For context, a slice of white bread typically has far more sodium than a glass of softened water.
What size water softener do I need for my home? Choosing the right size is crucial for efficiency. It’s based on two main factors: your water hardness level and your household’s daily water usage. You can find your hardness level with a simple test kit. Then, multiply that number by the number of people in your home and their average daily water use (usually around 75 gallons per person). This gives you the “grains of hardness” your softener needs to remove each day, which helps you select the correct capacity.
Can I still install a water softener if my home has a septic system? Yes, you absolutely can. Modern, high-efficiency water softeners are designed to be compatible with septic systems. The regeneration process adds a minimal amount of sodium and water to the septic tank, which doesn’t disrupt the natural bacterial balance. Just make sure you choose an efficient model to keep the discharge volume low.
What should I do if I start the DIY installation and realize I’m in over my head? First, don’t panic. It’s smart to recognize when a project has become more complex than you expected. The best thing to do is stop what you’re doing, turn the main water supply back off if you turned it on, and call a professional. A licensed plumber can step in at any stage, fix any issues, and complete the installation correctly and safely. It’s always better to ask for help than to risk a leak or damage to your plumbing.


