
In Tucson, our hard water can be tough on plumbing fixtures, and your toilet is no exception. Over time, mineral deposits and sediment can build up inside the delicate components of your toilet tank, causing them to fail. If you’re dealing with a toilet that won’t quit running, this buildup is a likely cause. When a toilet won’t stop running, the fill valve is particularly vulnerable, as tiny particles can prevent it from closing completely. This creates a slow, constant leak that wastes water and puts unnecessary wear on your toilet. We’ll show you how to identify the problem and get your toilet working efficiently again.
Key Takeaways
- Look inside the tank first: A running toilet is usually caused by a simple mechanical issue. Check if the float is set too high, the flapper isn’t sealing properly, or if the fill valve is clogged before assuming a major repair is needed.
- Try simple, no-cost adjustments: Before replacing parts, try adjusting the float height, clearing sediment from the fill valve, or untangling the flapper chain. These quick steps often solve the problem without a trip to the store.
- Know your DIY limits: If you’ve tried the basic fixes and the toilet still runs, or if you feel unsure about replacing parts, it’s time to call a professional. A quick expert visit can prevent a small issue from becoming a bigger, more expensive problem.
Why Won’t My Toilet Stop Running?
That constant hissing or trickling sound from your toilet isn’t just annoying; it’s a sign that water is being wasted, which can drive up your utility bills. When your toilet won’t stop running, it means water is continuously leaking from the tank into the bowl, and the fill valve keeps trying to refill the tank to the proper level. It’s a cycle that won’t stop until the underlying problem is fixed.
Fortunately, the cause is usually one of a few common culprits inside the toilet tank. Most of the time, it’s a simple mechanical issue that doesn’t require a major overhaul. The problem typically lies with a malfunctioning float, a worn-out flapper, a clogged fill valve, or a simple chain that’s gotten tangled. By taking a peek inside the tank, you can often spot the issue yourself. We’ll walk through the most frequent reasons your toilet keeps running and what you can do about them.
A Malfunctioning Float
Think of the float as the communication link for your toilet tank. It’s the ball or cup that rises with the water level. Once it reaches a certain height, it signals the fill valve to shut off the water supply. If the float is set too high, the water level will rise above the overflow tube, and the fill valve will never get the message to stop. Sometimes, older-style float balls can crack and fill with water, causing them to sink instead of float. When this happens, the fill valve runs indefinitely because it never receives the signal that the tank is full.
Debris and Mineral Buildup
Here in Tucson, we’re no strangers to hard water. Over time, mineral deposits can build up inside the delicate components of your fill valve. Tiny particles of sediment or rust can also get stuck in the valve, preventing it from closing completely. When the valve can’t create a tight seal, water will slowly but surely seep into the tank, even after the float has signaled it to stop. This constant, slow trickle is often just enough to keep your toilet running around the clock. These kinds of blockages are a common part of our drains and sewer services.
A Worn-Out Fill Valve Seal
Inside your fill valve is a small rubber seal that is essential for stopping the flow of water. Like any rubber component, this seal can degrade over time. It might become brittle, crack, or warp, losing its ability to form a watertight seal. When this happens, water will leak past the seal and into the tank, causing the toilet to run constantly. This is a very common wear-and-tear issue, especially in older toilets. The good news is that replacing this small part is often an inexpensive and quick fix that can solve the problem immediately.
Flapper and Chain Issues
The flapper is the rubber stopper at the bottom of your tank that lifts when you flush. If it doesn’t seal properly against the flush valve opening, water will leak from the tank into the bowl. Flappers can become old, brittle, or warped, preventing a tight seal. The chain connecting the flapper to the flush handle can also be the problem. If it’s too short, it will hold the flapper slightly open. If it’s too long, it can get caught underneath the flapper, also preventing it from sealing. This is one of the most common residential plumbing issues we see.
Is the Float the Culprit? Here’s How to Tell
The float is a simple but crucial part of your toilet’s tank. Its only job is to rise with the water level and tell the fill valve when to shut off. When it’s not working correctly, the fill valve never gets the message, and your toilet runs endlessly. Before you assume the worst, a few simple checks can tell you if the float is the source of your problem. These quick diagnostic steps don’t require any special tools and can save you a lot of guesswork.
Check the Water Level
First, take the lid off your toilet tank and look inside. The water level should stop about an inch below the top of the overflow pipe, which is the large vertical tube in the middle. If the water is spilling into that pipe, the level is set too high. This is a classic sign that your float isn’t shutting the water off soon enough. On most modern fill valves, you can find a small knob or clip that allows you to adjust the float’s height. Lowering it will make the valve shut off sooner, bringing the water to its proper level and stopping the constant running.
Manually Test the Float Arm
Here’s a quick test you can do while the tank is filling. Gently lift up on the float arm or the float cup itself. If the water stops running when you lift it, you’ve found your problem. This simple action confirms that the fill valve itself is working, but the float isn’t rising high enough on its own to trigger the shut-off mechanism. This usually means the float just needs a simple adjustment, which is great news. It’s one of the easiest fixes in residential plumbing and something you can likely handle in minutes.
Look for a Waterlogged Float
If you have an older toilet with a large, ball-shaped float, it might be waterlogged. Over time, these plastic balls can develop tiny cracks and fill with water. A waterlogged float is too heavy to rise properly with the water level, so it can’t signal the fill valve to stop. To check, lift the float out of the water. Does it feel heavy? Give it a little shake. If you hear water sloshing around inside, it’s time for a replacement. Luckily, a new float is inexpensive and easy to install.
Adjust the Float’s Height and Position
If your tests point to a float that’s simply set too high, adjusting it is your next step. For modern column-style floats, you’ll usually see a small screw or a clip you can pinch to slide the float down the fill valve tube. For older ball-and-arm floats, you may need to gently bend the metal arm downward. The goal is to lower the float so it shuts the water off when the level is about an inch below the overflow pipe. If you’ve made adjustments and the toilet still runs, it might be time to schedule an appointment with a professional.
How to Clean a Clogged Fill Valve
If your float seems to be working fine, the next likely culprit is a clogged fill valve. Over time, tiny bits of sediment, rust, or mineral buildup from the water supply can get stuck inside the valve, preventing it from closing completely. This is a common issue, especially in areas like Tucson with hard water. The good news is that cleaning it out is a straightforward fix you can likely handle yourself in just a few minutes. A good cleaning can solve many common residential plumbing issues without needing to replace any parts. Let’s walk through the simple steps to get your toilet back in working order.
Turn Off the Water and Remove the Valve Cap
First things first, you need to stop the water flow. Look for the small shutoff valve on the wall behind your toilet and turn it clockwise until it stops. Next, flush the toilet to empty the tank. Once the tank is empty, carefully lift the lid and set it somewhere safe where it won’t get knocked over. Now, look inside the tank for the fill valve; it’s the tall column on the left side. To remove the cap, you may need to press down and turn it counter-clockwise about a quarter turn, but check your specific model. It should lift right off.
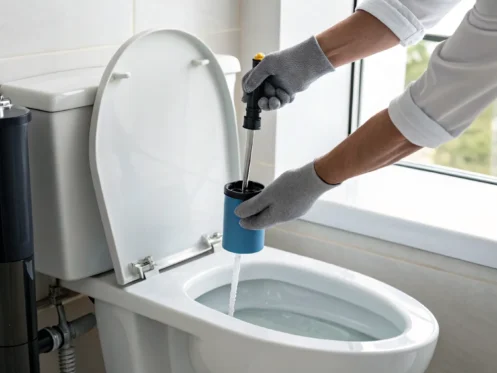
Flush Out Debris and Minerals
With the cap removed, you can now clear out the gunk. Grab a small cup and hold it upside-down over the top of the open valve. This little trick will prevent water from spraying all over your bathroom. While holding the cup in place, reach back and slowly turn the water supply on for just a few seconds. This will force a burst of water through the valve, flushing out any sand or sediment that was causing the blockage. Turn the water back off. This same principle helps clear larger drains and sewer lines, just on a much smaller scale.
Reassemble and Test the Valve
Now it’s time to put everything back together. Place the fill valve cap back on and secure it by turning it clockwise. Turn the water supply valve back on and let the tank refill. Watch the water level; for an efficient flush, it should stop about one inch below the top of the overflow tube (the open pipe in the middle of the tank). Listen carefully. If the water stops running once the tank is full, you’ve successfully cleaned the valve. If the problem continues, it might be time for a replacement part or a professional eye. If you’re not comfortable taking the next step, you can always schedule an appointment online with our team.
Signs Your Fill Valve Seal Is Worn Out
If cleaning the fill valve and checking the float didn’t work, the problem might be a small but crucial component: the fill valve seal. This rubber ring sits inside the fill valve, creating a watertight seal to stop water from entering the tank once it’s full. Over time, this seal can degrade, crack, or get warped by mineral deposits. When that happens, it can no longer do its job, leading to that constant, frustrating sound of a running toilet. The good news is that this is often a simple and inexpensive fix.
Spotting the Telltale Signs
The most obvious sign of a worn-out seal is a toilet that won’t stop running. You might hear a constant hissing or trickling sound coming from the tank. This isn’t just an annoying sound; it’s the sound of water and money going down the drain. A continuously running toilet can waste hundreds of gallons of water, causing a spike in your utility bill. If you notice these symptoms, it’s a clear signal that your fill valve seal needs attention. Ignoring it can lead to more significant residential plumbing issues.
Test the Seal by Lifting the Float
Here’s a quick diagnostic test to confirm if the seal is the problem. First, remove the lid from your toilet tank. With the water still running, locate the float and gently lift its arm as high as it will go. This action manually closes the fill valve. If the water stops, the issue is likely with the float’s adjustment, not the seal. However, if the water continues to run even while you’re holding the float up, you’ve found your culprit. The seal is no longer creating a proper closure, and it’s time for a replacement.
Steps for a Quick Replacement
Replacing a fill valve seal is a straightforward task. Start by turning off the water supply behind the toilet, then flush to drain the tank. Next, access the seal by removing the cap on top of the fill valve; most twist off counter-clockwise. You should see the rubber seal right underneath. Carefully remove the old seal, take it to a hardware store to find an exact match, and pop the new one into place. Reassemble the valve cap and turn the water back on. If the process feels overwhelming, you can always schedule an appointment with our team in Tucson.
When to Replace the Entire Fill Valve
Sometimes, a simple cleaning or a new seal just won’t cut it. If your fill valve has seen better days, or if you’re dealing with persistent issues, replacing the entire unit is often the most effective long-term solution. It might sound like a big job, but it’s a straightforward fix that can save you from future headaches and wasted water. Plus, newer fill valves are generally more efficient and easier to adjust than older models, making them a smart upgrade for any home in Tucson.
Signs It’s Time for an Upgrade
Not sure if you need a full replacement? Your toilet will usually give you a few clear signals. If it runs constantly no matter what you try, that’s a major red flag. Listen for strange noises, like hissing or gurgling sounds long after you’ve flushed. Another telltale sign is a tank that fills up very slowly or doesn’t fill completely. If your toilet is older or you live in an area with hard water, you might see visible mineral buildup on the valve. In these cases, starting fresh with a new fill valve is your best bet for a reliable fix.
Your Step-by-Step Replacement Guide
Ready to swap out the old valve? First, turn off the water supply using the shut-off valve behind the toilet. Flush the toilet to drain the tank, and use a sponge to soak up any remaining water. Place a bucket or some old towels under the water supply line connection to catch drips. Next, disconnect the supply line from the bottom of the tank and unscrew the locknut holding the old fill valve in place. Lift the old valve out, insert the new one, and secure it with its locknut. Finally, reconnect the water supply line, turn the water back on, and let the tank fill.
Choose the Right Type of Fill Valve
Before you head to the hardware store, it’s a good idea to know what you’re looking for. There are several types of fill valves, and you’ll need one that fits your specific toilet model. The easiest way to get the right part is to take the old fill valve with you. If you can’t, snap a few clear photos of it from different angles. This will help the store associate match you with the correct replacement. Getting an exact match is important because even small differences between brands can prevent a proper seal, leaving you right back where you started.
Test and Adjust Your New Installation
Once the new valve is in, the final step is to test your work. Let the tank fill completely and check the water level. It should stop about one inch below the top of the overflow pipe. Most new valves have a simple adjustment screw or clip to set the float to the correct height. After you’ve set the level, flush the toilet several times. Carefully watch the base of the toilet, the supply line, and all the connections for any signs of leaks. If you spot any drips or the problem continues, don’t hesitate to get professional help with your residential plumbing. You can always schedule an appointment online with our team.
Fixing Your Fill Valve? Avoid These Common Mistakes
Tackling a running toilet on your own can feel empowering, but a few common missteps can turn a simple fix into a soggy mess. Before you start, let’s walk through some key mistakes to avoid. Getting it right the first time will save you from headaches, wasted water, and a much bigger repair bill down the road. With a little preparation, you can handle this repair with confidence.
Don’t Make These Troubleshooting Errors
A constantly running toilet is more than just an annoying sound; it’s a sign that something is off. Often, the fix is surprisingly simple. The problem usually comes down to a worn-out part, mineral buildup, or a component that’s just slightly out of place. A common oversight is failing to check for tiny bits of sand or debris that can get stuck in the fill valve, preventing it from closing completely. Before you rush to replace the entire mechanism, take a moment to inspect and clean the valve. You might find that a little cleaning is all it takes to solve the problem and quiet your toilet for good.
Prevent Water Damage During Your Repair
The most critical step in any toilet repair is turning off the water supply before you begin. You can usually find the shut-off valve on the wall behind the toilet. Give it a gentle turn clockwise until it stops. If the valve is stuck or doesn’t fully stop the water, you’ll need to turn off your home’s main water supply. Once the water is off, flush the toilet to drain the tank and use a sponge to soak up any remaining water. This simple preparation is your best defense against accidental spills and potential water damage, making your residential plumbing project much smoother.
Know When to Call a Professional
There’s no shame in knowing your limits. If you’ve cleaned the valve, checked the float, and the toilet still won’t stop running, it might be time to call for backup. Continuing to tinker without a clear idea of the problem can sometimes lead to bigger issues. If you feel unsure at any point or the repair seems more complex than you expected, stepping back is the smartest move. A professional plumber can diagnose the issue quickly and ensure the repair is done right. When you’re ready for an expert opinion, our team is here to help you schedule online and get your toilet working perfectly again.
Related Articles
Frequently Asked Questions
My toilet just started running. What’s the quickest and easiest thing to check first? Before you get too deep into diagnostics, take the lid off the tank and check the flapper chain. Sometimes the chain is just a little too long and gets caught underneath the flapper, which prevents a good seal. Jiggling the handle can sometimes fix it temporarily, but making a small adjustment to the chain’s length is a simple, permanent fix for a very common problem.
How can I tell if the problem is the flapper versus something with the fill valve? A good way to distinguish between the two is to listen. If you hear a constant hissing sound from the side of the tank where the water line connects, the issue is likely with the fill valve not shutting off completely. If the toilet is mostly quiet but then refills on its own every so often (what we call a “ghost flush”), that usually points to a slow leak from a worn-out flapper that’s letting water seep from the tank into the bowl.
Is it expensive to have a professional fix a running toilet? Most running toilet issues are caused by small, inexpensive parts like a flapper or a fill valve seal. The repair is typically quick for a professional, which helps keep the overall cost reasonable. While a full fill valve replacement costs a bit more, it’s still one of the more affordable plumbing repairs you can have. It definitely costs less than letting the toilet run and paying for hundreds of gallons of wasted water on your utility bill.
How often should I expect to replace parts like the flapper or fill valve? The lifespan of your toilet’s internal parts can vary quite a bit. In an area like Tucson with hard water, mineral buildup can cause rubber parts like flappers and seals to degrade faster. Generally, you can expect a flapper to last around three to five years. A fill valve might last a bit longer, maybe five to seven years, but this isn’t a hard and fast rule. It’s a good idea to just check them for wear and tear once a year.
I’ve tried the fixes you suggested, but my toilet is still running. What should I do? If you’ve gone through the troubleshooting steps and the problem persists, it’s a good sign that it’s time to call a professional. Sometimes there can be a less obvious issue, like a crack in the overflow tube or a problem with the flush valve seat itself. Instead of getting frustrated, it’s best to let an expert take a look. A plumber can diagnose the root cause quickly and get it fixed correctly.


