
Have you noticed your hot water has a strange, rotten-egg smell? Or maybe you’ve seen a hint of rust in the water or a slow creep in your energy bills. These are common signs that your water heater’s anode rod is failing. This crucial part is designed to corrode so your tank doesn’t, but once it’s gone, your tank is left unprotected. The good news is that replacing it is a straightforward fix. The first step is simply finding the part. This guide will show you the exact ao smith gas water heater anode rod location and walk you through the entire replacement process to solve these issues.
Key Takeaways
- Protect your water heater with annual checks: The anode rod is a sacrificial part that corrodes to prevent your tank from rusting. Inspecting it yearly is crucial for avoiding leaks and extending your heater’s life, particularly with Tucson’s hard water.
- A DIY replacement is possible with the right approach: If you tackle this yourself, remember to shut off utilities, drain some water, and use a 1 1/16-inch socket. Don’t forget to wrap the new rod’s threads with Teflon tape to create a watertight seal.
- Recognize the red flags and know when to call for help: Smelly or discolored hot water, a pencil-thin rod, or visible rust are signs it’s time for a replacement. If the rod is stuck or you feel unsure about the process, calling a professional is the safest decision.
What Is an Anode Rod and Why Does It Matter?
Think of an anode rod as your water heater’s secret bodyguard. This simple metal rod, usually hidden on top of the unit, has one critical job: to protect the inside of your water heater tank from rust and corrosion. It’s a “sacrificial” part, meaning it is designed to attract corrosive elements in the water, drawing them away from the steel tank. By sacrificing itself, the anode rod dramatically extends the life of your water heater.
Without a functioning anode rod, the water would start eating away at the tank’s inner lining, leading to rust, leaks, and eventually, a total system failure. A new water heater is a significant investment, so paying attention to this small, replaceable part is one of the smartest things you can do as a homeowner. Checking and replacing your anode rod is a key piece of preventative maintenance that saves you money and prevents the headache of a sudden breakdown.
How It Protects Your Water Heater Tank
The science behind the anode rod is pretty straightforward. Your water heater’s tank is typically made of steel, which is prone to rusting over time. The anode rod is made from a more reactive metal, like magnesium or aluminum. Because of basic chemistry, corrosive particles in the water will attack the more reactive anode rod before they go after the steel tank. The rod essentially sacrifices itself to keep the tank safe. Over time, the rod will completely corrode away, and once it’s gone, your tank becomes the next target. This is why regular inspection is a vital part of your home’s residential plumbing maintenance plan.
Magnesium vs. Aluminum vs. Zinc Rods
Anode rods aren’t one-size-fits-all. They come in different materials, each with its own pros and cons. Magnesium rods offer excellent protection and are great for homes with soft water. However, they can wear out quickly in hard water and sometimes react with bacteria to create a “rotten egg” smell. Aluminum rods are more durable in hard water and last longer than magnesium, though their protective qualities are slightly less. If you notice a sulfur smell, a zinc-alloy rod can often solve the problem, as zinc helps neutralize the odor-causing bacteria.
Why Tucson’s Hard Water Wears Out Your Anode Rod Faster
If you live in Tucson, Oro Valley, or Marana, you know we have notoriously hard water. This high concentration of minerals like calcium and magnesium is tough on our plumbing systems, and it’s especially hard on anode rods. The extra minerals in the water accelerate the corrosive process, causing the anode rod to get eaten away much faster than it would in an area with soft water. For Tucson homeowners, this means an anode rod that might last five years elsewhere could be depleted in as little as two. This accelerated wear makes it crucial to inspect your anode rod more frequently to prevent premature tank failure and issues with your drains and sewer lines.
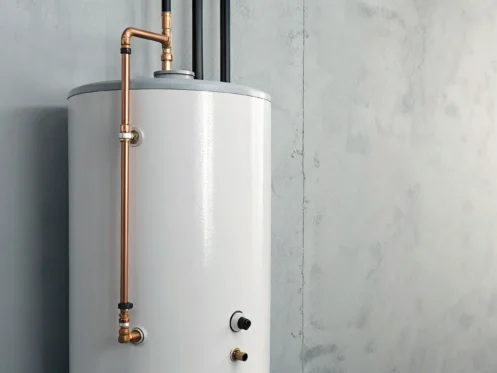
Finding the Anode Rod on Your A.O. Smith Heater
Alright, let’s find that anode rod. On most A.O. Smith water heaters, the rod is installed on the top of the tank, but it’s not always clearly marked. Think of it as a hidden guardian for your water heater, tucked away and doing its job quietly. Manufacturers don’t exactly put a big sign on it, so it can feel like a bit of a treasure hunt. The location can vary slightly between models, and it’s often disguised under a cap and insulation to keep the unit looking clean and streamlined. This is by design, but it can make your job as a homeowner a little tricky.
Finding it is the first and most important step in checking its condition and performing a replacement. If you can’t find it, you can’t maintain it, and a neglected anode rod can lead to a rusted-out tank and a premature water heater failure. That’s a costly and messy problem nobody wants to deal with, especially when it’s preventable. So, taking a few minutes to correctly identify this part is time well spent. Don’t worry, with a little guidance, you’ll know exactly what to look for. The process is usually straightforward, and once you locate it, you’re well on your way to completing this essential maintenance task. We’ll walk through what to look for on top of the unit, how to identify the specific hex head, and how to be absolutely sure you’ve got the right part before you proceed.
What to Look For on Top of the Unit
Start by looking at the top surface of your water heater. You’ll see a few connections and possibly a plastic cap or two. The anode rod is almost always located under one of these caps. It might be a separate, standalone cap, or it could be near the hot water outlet. You may need to gently pry this plastic cover off to see what’s underneath. Below the cap, you’ll likely find a layer of foam insulation. You can carefully dig this insulation out with a screwdriver or a small tool to expose the top of the anode rod. Just be gentle so you don’t damage any other components on top of the heater.
Locating the Hex Head Under the Cap
Once you’ve cleared away the cap and insulation, you should see a large hexagonal head, which looks like the top of a big bolt. This is the hex head of the anode rod. It’s what you’ll attach a socket wrench to when it’s time for removal. Typically, this requires a 1 1/16-inch socket. It’s important to distinguish the anode rod from the hot and cold water connections. The water connections will have pipes attached to them, while the anode rod will just be a hex head sitting flush with the tank’s top. Take a moment to confirm you’ve found the right part before you grab your tools.
How to Identify the Anode Rod
So, how can you be 100% sure you’ve found the anode rod and not something else? The anode rod is a simple, solid metal rod with a hex head on top. It won’t have any pipes or wires connected to it. In contrast, the hot and cold water inlets and outlets will be clearly connected to your home’s plumbing. They often have colored plastic rings (red for hot, blue for cold) to help identify them. The anode rod is a “sacrificial” part, meaning it’s designed to corrode so your tank doesn’t. If you’re still uncertain after looking, it’s better to be safe than sorry. Our team handles all kinds of residential plumbing services in Tucson and can make sure the job is done right.
Tools You’ll Need to Remove the Anode Rod
Before you get started, let’s make sure you have the right tools on hand. Gathering everything you need first will save you a lot of time and a few headaches. This isn’t a job that requires a massive, specialized collection of equipment, but having the correct items will make the process much smoother. Think of it as setting up your workspace so you can focus on the task without having to run back and forth to the garage. With the right setup, you can confidently tackle this piece of home maintenance and keep your water heater in great shape.
The Basic Toolkit for the Job
For most anode rod replacements, you won’t need a giant toolbox. The main tool for the job is a 1 1/16-inch socket wrench. You’ll use this to grip the hex head on top of the rod and turn it counterclockwise to loosen it. If the rod is a bit stubborn, which can happen, having a pipe wrench nearby can give you the extra leverage you need to get it moving. Think of it as your backup for a little extra muscle. Having these basics ready will make your residential plumbing maintenance go much more smoothly and help you avoid any frustrating snags along the way.
How to Handle a Stuck or Corroded Rod
Sometimes, an anode rod puts up a real fight, especially if it’s been a while or if it’s heavily corroded from dealing with Tucson’s hard water. Don’t worry, this is a common hurdle. If your socket wrench isn’t cutting it, it’s time to bring in something with more power, like a pipe wrench or an impact wrench. These tools provide the force needed to break through stubborn corrosion. Another great trick is to spray some penetrating oil on the threads and let it sit for a bit to work its magic. If you’ve tried everything and the rod still won’t budge, don’t force it and risk damaging your tank. It might be time to schedule a visit from a pro.
How to Replace Your Anode Rod: A Step-by-Step Guide
Ready to tackle this yourself? Replacing your anode rod is a totally manageable DIY project that can save you money and add years to your water heater’s life. It might seem a little intimidating, but with the right tools and a bit of patience, you can get it done in an afternoon. Just follow these steps carefully. And remember, if you get stuck or just don’t feel comfortable, our team is always here to help with any residential plumbing needs in Tucson.
Step 1: Turn Off the Gas and Water Supply
Safety is always the first priority. Before you do anything else, you need to cut the power and water to your heater. For a gas heater, turn the thermostat knob to the “Off” position. If you have an electric model, find the corresponding breaker in your home’s electrical panel and switch it off. Next, locate the cold water shut-off valve, which is usually a lever or dial on the pipe leading into the top of your water heater. Turn it clockwise to stop the water flow. This crucial step prevents the tank from refilling as you work and ensures you won’t be dealing with a live electrical current.
Step 2: Drain a Few Gallons from the Tank
You don’t need to drain the entire tank, just enough to lower the water level below the anode rod’s entry point. Attach a garden hose to the drain valve near the bottom of the tank and run the other end to a floor drain or outside. Open the valve to let a few gallons of water out. It also helps to open a hot water tap somewhere in your house, like a sink or bathtub. This lets air into the tank, which helps the water drain faster and relieves any built-up pressure inside the system, making the next steps much easier.
Step 3: Loosen and Remove the Old Rod
This can be the trickiest part of the job. The anode rod is usually under a plastic cap on top of the heater, secured with a hex head. You’ll need a 1 1/16-inch socket wrench to loosen it. These rods can be very tight, and corrosion can make them even tougher to break free. You might need a breaker bar for extra leverage. Turn the wrench counter-clockwise to loosen the rod. Once it breaks free, you can unscrew it the rest of the way and carefully pull it out of the tank. Be prepared, it might be long and a bit unwieldy.
Step 4: Inspect and Select the Right Replacement
Once the old rod is out, take a good look at it. A healthy anode rod is about half an inch thick. If yours is pencil-thin, covered in calcium deposits, or you can see the steel core wire, it was definitely time for a replacement. When choosing a new rod, you have a few options. Magnesium rods are great, but in areas with hard water like ours in Tucson, an aluminum rod is often a better choice to prevent buildup. If you’ve noticed a rotten egg smell from your hot water, a zinc-aluminum alloy rod can help solve that problem.
Step 5: Apply Teflon Tape and Install the New Rod
Before you install the new rod, wrap its threads with Teflon tape, also called plumber’s tape. Wrap the tape clockwise three or four times. This helps create a watertight seal and makes the rod easier to remove the next time you need to replace it. Carefully guide the new rod into the opening on the tank, making sure not to cross-thread it. Hand-tighten it first, then use your socket wrench to tighten it securely. You want it snug, but be careful not to over-tighten. This is one of many tasks our maintenance agreement covers if you’d rather leave it to a pro.
Step 6: Turn the Water and Gas Back On and Check for Leaks
Now it’s time to get things running again. First, close the drain valve on the bottom of the tank and remove the hose. Turn the cold water supply valve back on to start refilling the tank. Keep that hot water faucet in your house open; you’ll hear air sputtering out as the tank fills. Once you have a steady stream of water, you can close the faucet. Now, carefully check for any leaks around the new anode rod fitting. If everything is dry, you can safely turn the gas or electricity back on.
Step 7: How to Dispose of the Old Rod
What do you do with the old, corroded rod? The good news is that disposal is simple. Anode rods are typically made of magnesium, aluminum, or zinc wrapped around a steel core. You can usually dispose of them with your regular scrap metal recycling. Just check your local Tucson or Marana waste management guidelines to be sure. Pat yourself on the back for a job well done. You’ve just completed a key piece of maintenance that helps your water heater run efficiently and last longer, which is a big win for any homeowner.
Signs Your Anode Rod Needs to Be Replaced
Your water heater’s anode rod works quietly behind the scenes, but it gives off some pretty clear signals when it’s time for a replacement. Paying attention to these clues can help you avoid a sudden breakdown and a messy, expensive leak. If you notice any changes in your hot water or hear strange noises from your tank, it might be your anode rod asking for help. Here are the three most common signs that your anode rod is failing.
Visible Wear and Tear on the Rod
One of the most definitive ways to know if your anode rod is spent is to look at it. A healthy, new rod is about a half-inch thick and has a smooth surface. Over time, as it sacrifices itself to protect your tank, it will begin to look worn down. If you pull out your rod and see that it’s become thin, is covered in deep pits, or has the steel core wire showing through, its job is done. At this point, it can no longer protect your tank from corrosion. Regular inspections are a key part of smart residential plumbing maintenance and can catch this issue before it causes bigger problems.
Smelly or Discolored Hot Water
Have you ever turned on the hot water tap and been hit with a foul, rotten-egg smell? That unpleasant odor is a classic sign of a failing anode rod. The smell is often caused by a reaction between the anode rod (especially magnesium ones) and bacteria in the water supply, a common occurrence here in Tucson. You might also notice that your hot water is cloudy, discolored, or has a rusty tint. While smelly water can sometimes be mistaken for a drain issue, if it only happens with your hot water, the anode rod is the likely culprit.
Rust or Corrosion on the Water Heater Tank
If the anode rod is completely corroded, it can no longer protect the steel tank. The water will begin to attack the tank lining directly, leading to rust. You might see this as rusty-colored hot water coming from your faucets or, in more advanced cases, visible rust spots or corrosion on the exterior of the water heater itself. This is a serious red flag. It means your water heater is at high risk of developing a leak and failing completely. If you see any signs of rust on or around your tank, it’s time to schedule an appointment with a professional right away.
How Often Should You Check Your Anode Rod?
So, you know what an anode rod is and why it’s important. But how often do you actually need to worry about it? It’s not a part you can just forget about until something goes wrong. Staying on top of its condition is key to keeping your water heater running efficiently for years. The frequency of these checks depends on a few key things, but a simple schedule can make all the difference between a long-lasting unit and a premature replacement.
Why You Should Plan for Annual Inspections
As a rule of thumb, it’s a great idea to inspect your anode rod once a year. Think of it like an annual check-up for your water heater. This yearly peek allows you to catch the rod when it’s worn down but before it’s completely gone, which is when corrosion starts attacking your tank. A quick inspection can prevent a catastrophic tank failure and the messy, expensive flood that comes with it. Making this a regular part of your home maintenance routine is one of the smartest ways to protect your investment. If you’d rather not add another task to your to-do list, our maintenance agreement includes these essential checks to give you total peace of mind.
Factors That Influence Replacement Frequency
While an annual check is a solid starting point, some factors can speed up how quickly your anode rod wears out. Here in Tucson, our notoriously hard water is a major culprit. The high mineral content forces the anode rod to work overtime, sacrificing itself more quickly to protect the tank. Your household’s water usage also plays a big role. A large family using hot water for showers, laundry, and dishes will deplete the rod faster than a smaller household. The type of rod installed (magnesium versus aluminum) can also affect its lifespan. Because of these variables, it’s important to know what’s happening inside your specific unit, which is a core part of our residential plumbing services.
What Happens If You Don’t Replace a Failing Anode Rod?
Putting off this small maintenance task might not seem like a big deal, but ignoring a failing anode rod can lead to some serious and expensive problems down the road. Think of it as the unsung hero of your water heater; when it’s gone, the whole system is left vulnerable. From a rusty tank to surprisingly high energy bills, the consequences of inaction can hit both your home and your wallet. Let’s walk through exactly what happens when this crucial component is left to waste away.
The Risk of Tank Corrosion and Sediment Buildup
The anode rod’s entire job is to sacrifice itself for the greater good of your water heater. It’s made of metals that are more reactive than the steel lining of your tank. Corrosive elements in the water, which are especially common here in Tucson, attack the anode rod instead of the tank. Once the rod is completely corroded, your tank becomes the next target. Rust will begin to form on the inside of the tank, weakening the steel and leading to leaks. This corrosion also creates sediment that settles at the bottom, which can lead to clogs and other drain and sewer issues if left unchecked.
Why Your Energy Bills Might Increase
A corroded anode rod doesn’t just threaten the structure of your tank; it also hurts its efficiency. As the rod breaks down and sediment builds up at the bottom of the tank, it creates a layer between the heating element and the water. Your water heater now has to work much harder and run longer to heat the water to the set temperature. This extra work directly translates to more energy consumption, whether you have a gas or electric model, causing your monthly utility bills to creep up. Regular upkeep, like the services included in a maintenance agreement, helps keep your unit running efficiently and your energy costs down.
Avoiding a Premature Water Heater Replacement
The most significant consequence of a neglected anode rod is the premature failure of your water heater. Once the tank itself begins to rust and corrode from the inside, there’s no turning back. A leaking water heater tank cannot be repaired; it must be replaced entirely. This turns a simple, low-cost maintenance task into a major expense and a significant headache. By spending a little time and money to check and replace your anode rod every few years, you can easily extend the lifespan of your water heater. It’s one of the most effective ways to protect your investment and avoid an unexpected call for major residential plumbing services.
Common Mistakes to Avoid During Replacement
Replacing an anode rod is a great DIY project, but a few common missteps can turn it into a major headache. Knowing what to watch out for helps you get the job done right, protecting your water heater and preventing an emergency call. Let’s walk through the most frequent mistakes so you can confidently tackle this project.
Forgetting to Shut Off Utilities
This is the most critical safety step. Before you start, shut off the power and water. For a gas heater, turn the control knob to “Off”; for an electric model, flip the breaker. Next, close the cold water shut-off valve. Always turn off both the electricity (or gas) and the water supply to your water heater to prevent shock or flooding. If you’re ever unsure about your home’s plumbing systems, it’s always safest to call a professional.
Choosing the Wrong Rod or Tools
Anode rods aren’t one-size-fits-all. The wrong material or length can leave your tank unprotected. You typically remove the rod with a 1 1/16-inch socket wrench, but an impact wrench helps if it’s stuck from corrosion, which is common with Tucson’s hard water. Before buying a replacement, check your owner’s manual or measure the old rod to ensure you get the perfect match for your A.O. Smith unit.
Skipping the Teflon Tape
This small detail is crucial. When installing the new anode rod, wrap the threads with Teflon tape to create a secure, watertight seal. Skipping this step is a leading cause of slow leaks that lead to corrosion and water damage. After installing the new rod and turning the water back on, make sure to check for any water leaks around the new rod. This extra 30 seconds can save you from a major headache.
Ignoring Your Owner’s Manual
Your water heater’s owner’s manual is your best friend for this job. It has diagrams and part numbers that remove the guesswork. If you’re unsure where your anode rod is, your A.O. Smith water heater’s owner’s manual is the first place to look. It shows the exact location and specifies the correct replacement rod. If you’ve misplaced your copy, a quick online search should provide a digital version. If the job feels overwhelming, you can always schedule an appointment with our team.
Should You DIY or Call a Plumber in Tucson?
Deciding whether to replace your water heater’s anode rod yourself or call in a professional is a common crossroads for homeowners. On one hand, a successful DIY project can be satisfying and save you a bit of money. On the other hand, water heaters involve gas, electricity, and plumbing, so safety should always be the top priority. Your decision ultimately comes down to your personal comfort level, the tools you have available, and whether your water heater is showing any signs of more serious trouble that go beyond a simple worn-out rod.
Think of it this way: if the job is straightforward and you feel confident, it can be a great learning experience and a way to stay on top of your home maintenance. But if you run into any surprises, like a rod that won’t budge or a leak you didn’t expect, a professional plumber has the experience to solve the problem safely and efficiently. There’s no shame in calling for help; in fact, it’s often the wisest choice when dealing with essential home systems. Let’s break down when to tackle it yourself and when it’s best to make the call so you can make the right decision for your home.
When to Tackle It Yourself
If you’re comfortable with basic home repairs, replacing an anode rod is a very manageable task. For many homeowners, this is a great way to perform preventative maintenance and extend the life of their water heater without the cost of a service call. The process is generally straightforward: you’ll shut off the power and water, drain a little water from the tank, and use a 1 1/16-inch socket wrench to remove the old rod. If you’ve read through the steps, have the right tools ready, and feel confident in your ability to handle the job, this is a DIY project you can likely complete in an afternoon.
When It’s Time to Call Fusion Plumbing & Air
There are several situations where calling a professional is the smartest and safest choice. If you are at all uncomfortable working with your home’s gas or electrical systems, it’s best to leave it to an expert. Your safety is not worth the risk. Additionally, if you notice signs of a bigger issue, like a leaking temperature and pressure (T&P) relief valve or signs the tank is overheating, you need a professional diagnosis. These symptoms can point to problems that go beyond a simple anode rod replacement.
Sometimes a previous owner may have altered the water heater’s setup, making the job more complex than it appears. If you can’t get the old rod to budge or something just doesn’t look right, it’s time to call for backup. Our team provides expert water heater services throughout Tucson, Sahuarita, and Oro Valley. We can quickly diagnose the issue, replace the rod, and ensure your system is working safely. If you have any doubts, it’s always best to schedule a service call with our certified technicians.
Related Articles
- Electric Water Heater Parts: A Complete Guide
- How to Know If Your Water Heater Needs Replacing
- 7 Tips for Extending the Life of Your Water Heater
- Cost to Install a Water Softener: A 2026 Guide
- Water Softener & Filter System Install Cost Guide
Frequently Asked Questions
How long should my anode rod last in Tucson? While many anode rods can last up to five years in areas with soft water, that timeline doesn’t apply here. Due to Tucson’s very hard water, your anode rod works much harder and corrodes faster. We typically see them needing replacement every two to three years. The only way to know for sure is to perform an annual inspection, which gives you a clear picture of its condition before it fails completely.
My hot water smells like rotten eggs. Will a new anode rod fix this? Yes, that sulfur smell is a very common problem, and a new anode rod is often the solution. The odor is usually caused by a reaction between bacteria in the water and a standard magnesium anode rod. By replacing it with a zinc-aluminum alloy rod, you can neutralize that reaction and get rid of the smell. If the problem only occurs with your hot water, the anode rod is almost always the source.
What if I don’t have enough overhead clearance to remove the long rod? This is a great question and a common issue in homes where water heaters are tucked into closets or under stairs. The solution is a flexible anode rod. These rods are made of several smaller segments connected by a wire, allowing you to bend the rod and feed it into the tank one section at a time. They offer the same protection as a solid rod but are designed specifically for these tight installations.
I tried, but the old rod is completely stuck. What should I do now? If you’ve already tried using a breaker bar or an impact wrench and the rod still won’t budge, it’s time to stop. Applying too much force can crack the tank’s lining or break the fitting, turning a simple repair into a full water heater replacement. A stubborn rod, fused by years of corrosion, is a clear sign to call a professional plumber who has specialized tools to handle it safely.
Is it really worth replacing the anode rod on an older water heater? Absolutely, as long as the tank itself is still in good condition. If your water heater is around 8 to 10 years old but isn’t leaking and still heats water effectively, replacing the anode rod is a smart, low-cost investment. It can easily add several more years to the unit’s life, helping you postpone the major expense of a full replacement.


