
A water softener is one of those home upgrades that pays you back every single day. It’s not just about getting rid of annoying spots on your glassware; it’s about protecting the long-term health of your home’s most critical systems. Hard water minerals build up in your pipes and appliances, forcing them to work harder and wear out faster. By stopping this damage at the source, you save money on energy bills and future repairs. This article breaks down everything you need to know about water softener installation, from the initial costs to the long-term benefits, helping you see it not as an expense, but as a valuable investment in your home’s efficiency and longevity.
Key Takeaways
- Protect Your Home’s Plumbing: A water softener does more than eliminate hard water spots; it acts as a shield for your pipes and appliances. By removing scale-causing minerals, it helps your water heater run efficiently and extends the life of your entire plumbing system, preventing costly future repairs.
- Assess Your Skills Before You Start: A DIY installation is possible if you have plumbing experience and a straightforward setup, but a professional install is the safest bet. Hiring an expert ensures the job is done right, protects your warranty, and saves you from the headaches of potential leaks or improper setup.
- Plan Your Installation Space: The success of your installation depends on three key factors: location, drainage, and power. Your unit must be placed on the main water line before the water heater, with clear access to a nearby drain and a standard electrical outlet to function correctly.
What Is a Water Softener and How Does It Work?
If you’ve ever noticed chalky white spots on your dishes or felt like your soap just won’t lather, you’re likely dealing with hard water. A water softener is a whole-house filtration system that tackles this problem head-on. Think of it as a gatekeeper for your home’s water supply, specifically designed to remove the minerals that cause hardness—primarily calcium and magnesium.
As water flows from the municipal source into your home, it first passes through the water softener. Inside the unit, a clever process removes these troublesome minerals before the water travels to your faucets, showerheads, and appliances. This is crucial because hard water doesn’t just leave annoying spots on your glassware. Over time, it can create scale buildup inside your pipes and water heater, reducing efficiency and leading to costly residential plumbing repairs. By installing a water softener, you’re not just improving your water quality for showering and cleaning; you’re also protecting the entire plumbing system that keeps your home running smoothly.
How Ion Exchange Tackles Hard Water
The magic behind a water softener is a process called ion exchange. Your water softener tank is filled with thousands of tiny resin beads that are coated in sodium ions. As hard water flows through this tank, the calcium and magnesium minerals (which have a positive charge) are attracted to the negatively charged resin beads. The minerals essentially “stick” to the beads, and in exchange, the beads release their sodium ions into the water. This simple swap is what removes the hardness from your water. The softened water, now containing a small amount of sodium, continues on its way to your taps. Eventually, the resin beads become saturated with minerals and need to be cleaned through a regeneration cycle, which flushes the calcium and magnesium out and recharges the beads with new sodium ions.
Hard Water vs. Soft Water: What’s the Real Difference?
The core difference between hard and soft water is its mineral content. Hard water is packed with dissolved minerals like calcium and magnesium. This is what causes scale to build up in your coffee maker, clog your showerhead, and create blockages in your drains and sewer lines. It also reacts with soap to form a sticky scum, which is why it’s harder to get a good lather and can leave your skin feeling dry and your hair looking dull. Soft water, on the other hand, has had these minerals removed. The result is water that feels slicker to the touch and works much more effectively with soaps and detergents. You’ll use less soap, your appliances will last longer, and your skin and hair will feel cleaner and softer.
Is a Water Softener Worth It for Your Home?
If you live in an area with hard water, like many of us here in Arizona, you’ve probably seen the effects firsthand: chalky white residue on your faucets, spots on your dishes, and that film that never seems to wash off your shower door. A water softener is designed to solve these exact problems, but it’s a significant investment. So, is it really worth it for your home?
The short answer is a resounding yes for most homeowners dealing with hard water. The benefits go far beyond just getting rid of annoying spots. A water softener can protect your home’s entire plumbing system, improve the effectiveness of your soaps and detergents, and even make your skin and hair feel healthier. It’s one of those home improvements that pays you back every single day in convenience, savings, and comfort. Think of it as preventative care for your home’s circulatory system—the pipes. By removing the harsh minerals that cause buildup and corrosion, you’re not just solving a current annoyance; you’re preventing future, more expensive problems. When you weigh the upfront cost against the long-term damage hard water can cause, the decision becomes much clearer. Let’s look at exactly how.
Protect Your Plumbing and Appliances
Hard water is tough on your home. The minerals in it, primarily calcium and magnesium, build up inside your pipes and appliances over time. This buildup, called scale, restricts water flow, reduces efficiency, and can lead to costly repairs or premature replacements. Your water heater is especially vulnerable. Scale forces it to work harder to heat water, which wastes energy and shortens its lifespan.
By installing a water softener, you stop scale before it starts. Placing the softener before your water heater helps both appliances last longer and run more efficiently. This simple step protects your entire residential plumbing system, from the pipes hidden in your walls to the faucets you use every day, saving you from future headaches and unexpected bills.
Enjoy Better Cleaning and Softer Skin
One of the first things you’ll notice with soft water is how different it feels. Hard water problems like mineral buildup, soap scum, and dry skin will start to disappear. That’s because soft water allows soap to lather properly and rinse away completely. You’ll use less soap, shampoo, and detergent to get the same (or better!) cleaning results.
Your laundry will come out brighter and feel softer, and your dishes will be spot-free without needing a rinse aid. Plus, many people find that soft water is much kinder to their skin and hair, leaving them feeling less dry and itchy. It’s a small change that makes a big difference in your daily routine and overall comfort at home.
Save Money in the Long Run
While a water softener has an upfront cost, it’s an investment that saves you money over time. Your appliances will run more efficiently, which can lower your energy bills. You’ll also spend less on soaps, detergents, and cleaning supplies. Most importantly, you’ll extend the life of major appliances like your water heater, dishwasher, and washing machine, delaying expensive replacement costs.
While a DIY installation might seem like a way to save, it can lead to costly mistakes if not done correctly. Professional installation ensures the system is set up for optimal performance and won’t cause leaks or other plumbing issues. If you’re simply replacing an old unit, the job is often quick and straightforward for a pro. Investing in proper installation from the start is often the most cost-effective choice.
What Tools and Materials Do You Need for Installation?
Before you start unscrewing pipes, let’s talk about preparation. A successful DIY project starts with having all your tools and materials laid out and ready to go. Taking the time to gather everything you need upfront will save you from making multiple trips to the hardware store and prevent a lot of frustration. Think of it as your pre-installation checklist to ensure a smooth process from start to finish. Getting this right sets the stage for a leak-free installation and a system that works perfectly for years to come.
Your Installation Tool Checklist
First, let’s round up your tools. You don’t need a professional-grade workshop, but a few specific items are essential for connecting the water softener to your home’s residential plumbing. You’ll need two 1-inch NPT female connectors to create a secure link between the softener and your water lines. You’ll also need enough tubing to bridge the gap between the unit and your main water supply. Depending on your existing pipes, this could be copper, PVC, or another flexible material. Make sure you measure the distance carefully so you have plenty of length to work with without creating unnecessary tension on the lines.
Required Parts and Components
Beyond the basic tools, a few key components are necessary for the system to function correctly. Your water softener likely came with about 10 to 12 feet of drain tubing, but if your drain is located farther away, you’ll need to purchase additional ½-inch tubing to ensure proper drainage. This is a step you don’t want to skip, as it prevents messy backups. You also need to have a standard 120V grounded electrical outlet nearby to power the unit’s control valve and digital display. Make sure it’s connected to a circuit breaker for safety.
Essential Safety Gear and Prep Work
Safety should always be your top priority. Before you do anything else, shut off your home’s main water supply. This is a non-negotiable step to prevent flooding and water damage while you work. Once the water is off, open a few faucets to drain any remaining water from the pipes. After the installation is complete and you turn the water back on, you’ll need to carefully check for any leaks around the new connections. If you spot a drip or feel unsure about a connection, it’s always better to be safe than sorry and schedule an appointment with a professional.
How Much Does Water Softener Installation Cost?
Figuring out the budget for a new water softener is a top priority for any homeowner. The final cost isn’t just the price tag on the unit itself; it’s a combination of the system you choose, the complexity of the installation, and whether you decide to tackle it yourself or call in a professional. The size and type of softener play a big role, as does the current state of your plumbing. If new pipes need to be run or your main water line has to be reconfigured, that will add to the overall expense.
Think of it as a long-term investment in your home’s health. A quality installation protects your pipes and appliances from the damaging effects of hard water, which can save you a lot of money and headaches down the road. Whether you’re a seasoned DIYer or prefer to leave it to the experts, understanding the full scope of the costs involved will help you make a smart decision for your home and your wallet. We’ll break down what you can expect to pay for both a DIY project and a professional installation, so you can plan accordingly.
Breaking Down the Cost of a DIY Install
If you’re handy and comfortable with plumbing, a DIY installation can save you money on labor. Your main expense will be the water softener unit itself, plus any tools or materials you don’t already own, like copper pipe, fittings, and tubing. If you’re simply replacing an old unit, the job might only take an hour or so. However, installing a system from scratch is a different story. It requires more advanced plumbing knowledge and can take several hours to complete correctly. Before you start, honestly assess your skill level. A small mistake can lead to leaks or improper function, potentially costing more to fix than a professional installation would have in the first place.
What to Expect from Professional Pricing
When you hire a professional, you’re paying for more than just labor—you’re paying for peace of mind. The total cost will include the water softener system, all necessary parts, and the technician’s time and expertise. A licensed plumber can assess your home’s specific needs, ensure the unit is installed correctly, and prevent costly mistakes that could damage your plumbing or even void your new system’s warranty. At Fusion Plumbing & Air, our team handles every aspect of your residential plumbing needs, ensuring your water softener is set up for optimal performance from day one. We provide clear, upfront pricing so you know exactly what to expect.
Planning for Hidden Expenses and Maintenance
Many homeowners budget for the water softener but forget about the extras. Depending on your water source, especially if you have well water, you might need additional components like a sediment pre-filter or a UV sterilizer to ensure your water is clean and safe. These are essential for the system to work effectively but add to the initial cost. You should also plan for ongoing expenses. Water softeners require salt to function, which you’ll need to buy regularly. To keep your system running efficiently for years, consider a maintenance agreement that includes regular check-ups and service, preventing small issues from turning into major problems.
DIY or Hire a Pro: How to Decide?
Deciding whether to install a water softener yourself or call in a professional is a common crossroads for homeowners. On one hand, a DIY project can save you money on installation fees. On the other, a mistake could lead to leaks, damage, and a system that doesn’t work correctly. The right choice depends on your plumbing skills, your home’s existing setup, and your comfort level with the project. Thinking through a few key factors will help you figure out the best path forward for your home and your budget.
When a DIY Installation Makes Sense
If you’re comfortable with basic plumbing and have a free weekend, a DIY installation might be for you. Some water softener models are designed for homeowner installation, especially if you’re just replacing an old unit. If your home already has a “softener loop”—a set of pipes specifically for a water softener—the job becomes much simpler. With the right tools and a clear set of instructions, you could have your new system running in a few hours. This path is best for those who have some home improvement experience and enjoy the satisfaction of doing it themselves.
The Benefits of Professional Installation
While a DIY approach can seem tempting, there are strong reasons to hire a professional. An expert installation ensures the job is done right the first time, preventing costly mistakes and potential water damage. Our team of certified technicians can handle any unexpected plumbing challenges and make sure your system is calibrated perfectly for your home’s needs. A professional install also protects your manufacturer’s warranty, which can be voided by improper installation. It’s an upfront investment that provides peace of mind and guarantees your water softener works efficiently for years to come.
Key Questions to Ask Before You Choose
Before you make a final decision, take a moment to answer these questions. First, what is your home’s current plumbing setup? Look for a softener loop and a nearby drain. If you don’t have one, the project will be more complex. Second, do you know your water’s hardness level? A professional water test can determine the exact size and type of softener you need. Finally, have you budgeted for the full cost, including any extra parts and ongoing maintenance? If you’re feeling unsure about any of these points, it’s always a good idea to schedule a consultation with a professional.
How to Install a Water Softener: A Step-by-Step Guide
If you’ve decided to take on the installation yourself, you’re in the right place. Installing a water softener is a manageable project for a homeowner with some solid DIY experience, but it’s one that requires careful planning and attention to detail. This process involves working directly with your home’s main water supply and making secure connections, so it’s not a task to rush through on a busy afternoon. Before you even open the box, make sure you’ve read the manufacturer’s instructions thoroughly, as every model has its own specific requirements.
This guide will walk you through the fundamental steps that apply to most water softener installations. We’ll cover everything from picking the perfect spot to programming your new system. Remember, the goal is a leak-free setup that provides your home with soft water for years to come. If at any point you feel unsure about cutting into your pipes or handling the plumbing connections, don’t hesitate to call in a professional. A small mistake can lead to significant water damage, and the expert team at Fusion Plumbing & Air is always ready to ensure your residential plumbing is handled correctly and safely.
Step 1: Prepare Your Space and Choose a Location
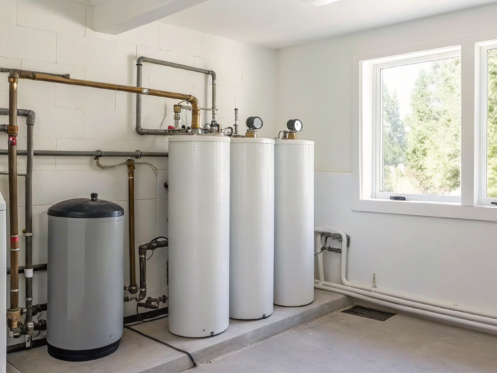
Finding the right home for your water softener is the most important first step. You’ll want to place the unit as close as possible to the point where the main water line enters your house. Crucially, it must be installed before the line splits off to your water heater. This ensures that both your hot and cold water are treated, protecting all of your appliances.
Clear a level area of about three-by-three feet to give yourself enough room to work and to access the unit for future maintenance. Your chosen spot also needs to be near a standard 120V electrical outlet for power and within reach of a drain (like a floor drain or utility sink) for the regeneration cycle.
Step 2: Connect the System to Your Plumbing
Now for the main event: connecting the softener to your water lines. Start by shutting off the main water supply to your house and draining the pipes by opening a nearby faucet. Using a pipe cutter, remove a section of the main water line where the softener will go. From there, you’ll install the fittings that connect your home’s plumbing to the softener’s bypass valve.
Make sure all connections are clean, properly fitted, and securely soldered or tightened to prevent leaks. Once everything is connected, you can close the bypass valve and turn the main water supply back on slowly. This is a critical moment to check for any drips or leaks around your new connections before proceeding.
Step 3: Hook Up the Drain and Power
With the main plumbing connected, it’s time to set up the drain and get the unit powered on. Your water softener will come with a drain hose that needs to be run to your chosen drain. Secure the hose so it won’t pop out during the regeneration cycle, leaving an air gap of about two inches between the end of the hose and the drain itself to prevent backflow.
If the provided tubing isn’t long enough, you can purchase additional tubing to extend it. Next, plug the unit’s power cord into a grounded electrical outlet. It’s best to use an outlet that isn’t connected to a switch so the softener doesn’t get turned off by accident.
Step 4: Program and Test Your New System
You’re on the home stretch! With everything connected, it’s time to bring your system to life. First, slowly open the bypass valve to let water into the softener, listening and watching carefully for any signs of leaks. Next, add the salt to the brine tank, filling it about halfway as recommended by the manufacturer.
Finally, follow the instructions in your owner’s manual to program the unit. You’ll need to input your water hardness level, the time of day, and your preferred regeneration time. Once programmed, run a manual regeneration cycle to make sure everything is working correctly. If you notice any issues, you can always schedule an appointment for a professional inspection.
How to Handle Common Installation Challenges
Even the most straightforward home projects can hit a snag. Installing a water softener is no different, but knowing what to look for can help you avoid common frustrations. From tricky pipe configurations to simple user errors, a little preparation goes a long way. Let’s walk through some of the challenges you might face and how to handle them, so you can get your system up and running smoothly.
Working with Tricky Plumbing Setups
Every home’s plumbing is a little different, especially in older houses. Before you even buy a unit, take a good look at your main water line. You’ll need to find a spot to tap into the system after the water meter but before the line splits off to your water heater. Some plumbing configurations can be more complex, making it tough to find an accessible and appropriate place for the softener. If your pipes are in a tight crawlspace or behind a finished wall, the job gets significantly harder. Assessing your setup first helps you understand the scope of the project and decide if it’s a task you’re ready to tackle.
Solving Access and Utility Connection Issues
Your water softener needs three things to function: access to your main water pipe, a place to drain, and a power source. Before you start, confirm you have all three in your chosen location. You’ll need enough space to not only fit the unit but also to work around it comfortably during installation and future maintenance. The system needs to discharge brine during its regeneration cycle, so a nearby floor drain, utility sink, or standpipe is essential. Finally, most modern softeners require a standard electrical outlet to power the control valve, so make sure one is within reach.
Troubleshooting Common Installation Mistakes
A DIY installation can be rewarding, but small mistakes can lead to big problems like leaks or even damage to your plumbing. One of the most common errors is improperly connecting the inlet and outlet hoses, which can prevent the system from working correctly. It’s also crucial to follow the manufacturer’s instructions for the initial setup, especially when it comes to programming the unit for your home’s specific water hardness. After everything is connected, be sure to close the bypass valve and turn the water back on slowly. This lets you carefully check for leaks at every connection point before a small drip becomes a major issue.
Your Guide to Post-Installation Maintenance
The good news is that once your water softener is installed correctly, the ongoing maintenance is pretty simple. Your main job is to keep the brine tank filled with salt. The salt is what allows the resin beads inside the tank to regenerate, which is how they continue to capture those hard water minerals. How often you’ll need to add salt depends on your water hardness and how much water your household uses. Just check the tank level once a month and top it off as needed. Keeping up with this simple task ensures you’ll have a continuous supply of soft water. For total peace of mind, you can also look into a professional maintenance agreement to keep your system in top shape.
Related Articles
- Home Water Filtration System Services – Tucson, AZ
- 7 Tips for Extending the Life of Your Water Heater | Fusion Plumbing & Air
- Water Filtration Tucson, AZ | Fusion Plumbing & Air
- How To Know When To Replace The Water Heater | Fusion
- Five Ways to Identify Poor Water Quality | Fusion Plumbing & Air
Frequently Asked Questions
Will a water softener make my drinking water salty? That’s a common myth, but the answer is no. While the system uses salt in a brine tank for its cleaning cycle, the process adds only a very small amount of sodium to your water. The amount is typically so minimal that you won’t taste any difference at all. Your water will simply feel smoother and work much more effectively with soaps.
How do I know what size water softener my home needs? The right size for your home depends on your water hardness level and how much water your family uses daily. A system that’s too small will constantly be regenerating and won’t keep up with demand, while one that’s too large can be inefficient. The most accurate way to determine the perfect fit is to have your water tested and get a professional recommendation based on your household’s specific needs.
How often will I need to add salt to the tank? For an average family, you can expect to add salt to the brine tank every month or two. The exact frequency depends on how hard your water is and how much of it you use. A good habit is to simply check the salt level once a month and add more when you see it’s about halfway down. It’s a quick task that is essential for keeping your system running smoothly.
What’s the difference between a water softener and a water filter? It’s easy to get these two confused, but they perform very different functions. A water softener is specifically designed to remove the minerals, like calcium and magnesium, that cause scale buildup and soap scum. A water filter, however, is designed to remove other impurities such as chlorine, sediment, or bacteria to improve the taste, smell, and overall quality of your drinking water.
Can I connect the softener to just my hot water line to protect my water heater? You should always install a water softener on the main water line before it splits into hot and cold. While protecting your water heater is a major benefit, hard water damages all of your plumbing and water-using appliances. Treating all the water entering your home ensures that your faucets, showerheads, dishwasher, and washing machine are protected from scale buildup, not just your water heater.


