
Here in Tucson, our hard water can be tough on appliances, and your toilet is no exception. Over time, mineral buildup can cause the rubber and plastic parts inside your toilet tank to degrade, leading to leaks. If your dual flush toilet keeps running after flush, there’s a good chance that limescale has damaged a seal or is preventing the flapper from closing properly. While hard water is a common suspect, other simple issues like a tangled chain or a faulty fill valve could also be the cause. Let’s walk through the diagnostic steps to pinpoint the problem and get your toilet working efficiently again.
Key Takeaways
- Check the Usual Suspects First: A running toilet is almost always caused by a faulty flapper, a malfunctioning fill valve, or an improperly adjusted chain. A quick visual inspection inside the tank will often reveal the problem right away.
- Most Fixes are Simple DIY Projects: Replacing a worn-out flapper or adjusting the water level float are inexpensive and straightforward repairs you can typically handle yourself with basic tools, stopping the leak and saving water.
- Don’t Let a Small Leak Become a Big Bill: If you’ve tried the simple fixes and the toilet is still running, it’s time to call a professional. A persistent leak wastes hundreds of gallons of water, and an expert can solve the root problem efficiently.
Why Won’t My Dual Flush Toilet Stop Running?
That constant sound of a running toilet is more than just an annoyance—it’s a sign that water and money are going down the drain. While dual flush toilets are fantastic for conserving water, they aren’t immune to the occasional hiccup. When your toilet won’t stop running, it means water is continuously leaking from the tank into the bowl, triggering the fill valve to keep refilling the tank in a never-ending cycle.
The good news is that the cause is usually one of a few common culprits. From a simple chain adjustment to a worn-out seal, most issues are straightforward to identify. Before you start worrying about a major residential plumbing problem, let’s walk through the most likely reasons your dual flush toilet is acting up. Understanding what’s happening inside the tank is the first step to getting it fixed and restoring peace and quiet to your bathroom.
A Faulty Flapper Seal
Think of the flapper as the gatekeeper between your toilet tank and the bowl. This rubber seal is supposed to create a watertight barrier, holding water in the tank until you flush. Over time, this little component can wear out. The rubber can crack, warp, or become dirty, which prevents it from sealing properly. When the flapper doesn’t create a tight seal, water continuously trickles from the tank into the bowl. This slow leak is often the primary reason a toilet keeps running long after you’ve flushed. It’s a common issue, especially in older toilets, but thankfully, it’s also one of the easiest parts to inspect and replace.
A Malfunctioning Fill Valve
The fill valve is the tall column-like mechanism inside your tank responsible for refilling it with water after each flush. It’s designed to shut off automatically once the water reaches a preset level. If the fill valve is broken or malfunctioning, it might not shut off correctly. This can cause it to let too much water into the tank, which then spills into the overflow tube and down into the bowl. This constant overflow forces the valve to keep running in an attempt to fill a tank that will never be full. It’s a classic case of a part simply wearing out from use.
Incorrect Chain Length
The chain connects the flush buttons on your lid to the flapper at the bottom of the tank. Its length is surprisingly important. If the chain is too short, it will pull on the flapper, preventing it from ever closing completely and creating a constant leak. On the other hand, if the chain is too long, it can get tangled or caught underneath the flapper, also stopping it from forming a tight seal. For most toilets, the chain should have just a little bit of slack—about one or two links’ worth. It’s a small detail that can make a big difference in your toilet’s performance.
An Improper Water Level
Even if your fill valve is working perfectly, the water level in the tank might be set too high. Inside your toilet tank, there is an overflow tube, which is a safety feature designed to prevent the tank from overflowing onto your bathroom floor. If the water level is adjusted to be higher than the top of this tube, water will constantly spill into it and drain into the bowl. Most tanks have a fill line marked on the inside wall to show the correct water level. If your water is above that line, it’s a clear sign that an adjustment is needed.
Mineral Buildup and Debris
Here in Tucson, we’re no strangers to hard water. Over time, minerals like calcium and magnesium can build up on the inner workings of your toilet, a problem known as limescale. This buildup is especially troublesome for the flapper seal. When limescale forms on the rubber seal or the flush valve opening, it creates a rough, uneven surface that prevents the flapper from sealing tightly. This allows water to leak slowly into the bowl, causing the toilet to run. This kind of buildup can affect all your drains and sewer lines, but it’s often most noticeable in your toilet tank.
How to Diagnose Your Running Toilet
That constant hissing sound from your toilet is more than just an annoyance—it’s a sign of wasted water and a higher utility bill. Before you can fix the problem, you need to play detective and figure out what’s causing the leak. The good news is that you don’t need to be a plumbing expert to do a little investigating. Most of the common culprits are located right inside the toilet tank, and identifying them is often straightforward.
By taking a few minutes to look inside the tank and run a couple of simple tests, you can pinpoint the source of the issue. This will help you decide if it’s a quick DIY fix or a job that requires a professional. Let’s walk through the diagnostic steps together so you can get that toilet running properly again and bring some peace and quiet back to your bathroom.
Your Visual Inspection Checklist
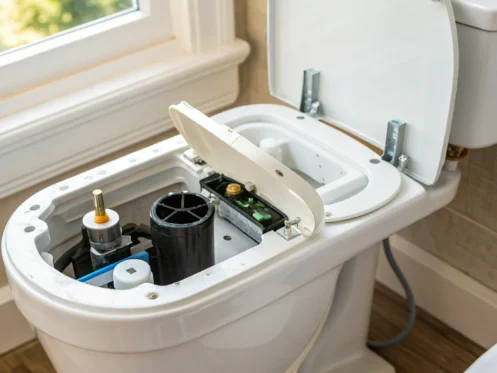
First things first, let’s take a look inside. Remove the tank lid and set it aside carefully on a towel—they can be fragile and expensive to replace. Now, just observe what’s happening. You’ll see several parts inside, and any one of them could be the source of the problem. Look for anything that seems out of place. Is the chain tangled or disconnected? Is the fill valve spraying water erratically? Does the water level seem too high, spilling into the overflow tube? A quick visual scan can often reveal the issue right away. This initial check gives you a baseline before you start testing individual components.
Test the Flapper Mechanism
The flapper is the rubber seal at the bottom of your tank that lifts when you flush. If it doesn’t create a perfect seal, water will continuously leak from the tank into the bowl. This is one of the most common reasons a toilet keeps running. An easy way to test this is with a few drops of food coloring. Add the coloring to the tank water and wait about 15-20 minutes without flushing. If you see colored water appear in the toilet bowl, you’ve found your culprit: a leaky flapper. This simple test confirms that the seal is compromised and needs attention.
Check the Fill Valve’s Operation
The fill valve is the tall mechanism that refills the tank with water after you flush. If it’s not shutting off correctly, the tank will keep filling, and excess water will drain into the overflow tube. To check it, flush the toilet and watch the fill valve as the tank refills. It should stop completely once the water reaches the designated level. If it continues to hiss, spray, or let water trickle through, it’s likely malfunctioning. Often, sediment or debris can get lodged in the valve, preventing it from closing properly. This is a frequent cause of many common residential plumbing issues that homeowners in Tucson face.
Identify Chain and Water Level Issues
Two other simple things to check are the flush chain and the water level. The chain connects the flush lever to the flapper. If it’s too short, it will hold the flapper slightly open, causing a constant leak. If it’s too long, it can get caught underneath the flapper, also preventing a proper seal. The chain should have just a little bit of slack—about one or two links’ worth is perfect. Next, check the water level. Most tanks have a line marking the correct water level. If the water is above this line and flowing into the overflow tube, you’ll need to adjust the fill valve’s float to lower it.
What You’ll Need for the Repair
Before you roll up your sleeves, let’s get your toolkit ready. The good news is that you probably have most of what you need lying around the house. Fixing a running toilet is usually a simple project that doesn’t require a trip to the hardware store for fancy equipment. Gathering everything beforehand makes the process smoother and helps you finish the job quickly. A little preparation goes a long way in turning a potential headache into a satisfying DIY win. Let’s walk through the essential tools, common parts you might need, and how to get your workspace ready for a clean and easy repair.
Essential Tools for the Job
You don’t need a professional-grade toolbox for this fix. Start by grabbing a few old towels and a bucket or large sponge to handle any leftover water in the tank. You’ll also want a pair of adjustable pliers and maybe a flathead screwdriver. However, the most important first step involves a tool that’s already attached to your toilet: the water supply shutoff valve. Before you do anything else, find this valve on the wall behind your toilet and turn it clockwise to shut off the water. This prevents any unexpected messes and is the golden rule of any plumbing repair.
Common Replacement Parts to Keep on Hand
Most running toilet issues come down to one of two small parts: the flapper (or flush valve seal) or the fill valve. If the rubber seal on your flapper is warped or degraded, it won’t create a tight seal, causing a constant leak. These are very inexpensive—usually just a few dollars at any hardware store. If the problem is the fill valve, which controls the water refilling the tank, a full replacement is often the best solution. Brands like Fluidmaster and Korky are reliable choices. It’s a good idea to take a picture of your toilet’s inner parts before you head to the store to make sure you buy the right replacements.
Safety and Preparation
With your tools and parts ready, it’s time to prep your workspace. First, as we mentioned, turn off the water supply valve behind the toilet. Next, flush the toilet to drain as much water as possible from the tank and bowl. Take off the tank lid and set it aside carefully on a towel so it doesn’t crack. Use your sponge or a small cup to remove the last inch or so of water from the bottom of the tank. This gives you a clean, dry space to work in. It’s also a good time to check that the float—the part that rises with the water level—isn’t getting caught on anything inside the tank.
How to Fix Your Running Dual Flush Toilet, Step-by-Step
Ready to tackle that running toilet? Don’t worry—this is usually a straightforward job you can handle yourself. By following these steps, you can identify the problem and get your toilet back to normal in no time. We’ll start with the simplest fixes first. Before you begin, make sure to turn off the water supply to your toilet using the shut-off valve on the wall behind it, then flush to drain the tank. If at any point you feel out of your depth, remember that our team is always ready to help with any residential plumbing issues in Tucson and the surrounding areas.
Adjust the Flapper and Chain
First, let’s look at the chain connected to your flush buttons. If the chain is too short, it will hold the flapper (the rubber seal at the bottom of the tank) slightly open, preventing it from sealing properly. If it’s too long, it can get caught underneath the flapper. You’re looking for just a little bit of slack in the chain when the flapper is closed. You can easily unhook the chain and connect it to a different link to adjust its length. Also, check the gasket or seal located at the bottom of the flush mechanism. Make sure it’s sitting flat and creating a tight seal over the opening.
Replace a Worn Flapper
If adjusting the chain didn’t solve the problem, the flapper itself might be the issue. Over time, these rubber seals can warp, crack, or become brittle, especially with Tucson’s hard water. A worn-out flapper won’t create the tight seal needed to stop water from leaking into the bowl. Replacing it is simple. With the water off and the tank empty, you can unclip the old flapper from the overflow tube and lift it off. Take the old one with you to the hardware store to ensure you get an exact match, then clip the new one into place.
Repair or Replace the Fill Valve
If the flapper is in good shape, the next part to check is the fill valve. This is the tall mechanism that refills the tank with water after you flush. If it’s faulty, it may not shut off properly, causing water to run continuously. While you can sometimes repair them, replacing the entire fill valve is often the most effective fix. This is a bit more involved, as you’ll need to disconnect the water supply line from the bottom of the tank. If you’re not comfortable with this step, it might be a good time to schedule online with a professional.
Correct the Water Level
Sometimes, the fix is as simple as adjusting the water level inside the tank. Look for the overflow tube—a tall, open pipe. The water level should be about an inch below the top of this tube. If it’s too high, water will constantly spill into the tube and down into the bowl. You can lower the water level by adjusting the float on the fill valve. Most modern fill valves have an adjustment screw or a clip you can move to change the float height. Lowering the float will cause the fill valve to shut off sooner, saving water and stopping the run.
Clean Away Mineral Deposits
Living in areas like Oro Valley or Marana means dealing with hard water, which can lead to mineral buildup inside your toilet tank. These limescale deposits can form on the flapper seal or around the flush valve opening, preventing a proper seal. Take a look at the rubber seal for any white, crusty buildup. You can often clean this off with a sponge or a soft brush. For stubborn deposits, a little vinegar can help dissolve them. Sometimes, simply cleaning the parts is all it takes to get your toilet working perfectly again.
Repair or Replace? Deciding on New Toilet Parts
Once you’ve pinpointed the problem, you’ll need to decide whether a simple adjustment will do or if it’s time to buy new parts. The good news is that most internal toilet components are inexpensive and designed to be replaced every few years. Making the right call is usually straightforward and depends on the visible condition of the part in question. A quick trip to the hardware store is often all it takes, but if you find yourself replacing the same part repeatedly, it could signal a bigger issue that needs a professional eye.
Signs It’s Time for a New Flapper
The flapper is the rubber seal at the bottom of your tank that lifts when you flush. Over time, this part can become warped, cracked, or covered in mineral deposits, preventing a tight seal. If you inspect your flapper and notice it’s no longer soft and flexible, or if you see visible damage like bubbling or peeling, it’s definitely time for a replacement. While cleaning off buildup can sometimes help, a new flapper is the only real solution if the material itself is breaking down. This is one of the most common causes of a silent but steady leak from the tank into the bowl.
When to Replace the Fill Valve
The fill valve is the tall assembly that refills the tank after a flush. If you’ve already ruled out the flapper and chain and have tried adjusting the water level without success, the fill valve is your next suspect. These parts can wear out internally, causing them to run constantly or fail to shut off at the correct water level. While some models can be repaired, replacing the entire fill valve is often easier and more reliable. It’s a common fix that many homeowners can handle, but if you’re not comfortable tackling it, our team handles all types of residential plumbing issues and can get it done quickly for you.
Considering the Cost: Repairs vs. Replacements
When it comes to a running toilet, a small investment in new parts can save you a lot of money down the road. Replacement kits for flappers or fill valves typically cost between $15 and $35. Compare that to the cost of wasted water—even a small, constant leak can add a surprising amount to your monthly water bill. Fixing the problem promptly is one of the smartest financial decisions you can make for your home. Think of it this way: the repair often pays for itself in water savings within just a month or two.
How to Prevent Future Toilet Troubles
Now that you’ve fixed your running toilet, let’s talk about how to keep it from happening again. A little bit of prevention goes a long way in avoiding future headaches and surprise water bills. By paying attention to your toilet and performing some simple checks, you can catch small issues before they turn into bigger, more expensive problems. These simple habits will help keep your dual flush toilet working efficiently for years to come, saving you from the frustration of a constantly running toilet and the wasted water that comes with it.
Follow a Regular Maintenance Schedule
The best way to prevent problems is to catch them early. Setting aside time for a quick check-up every six months can make a huge difference. A common reason dual flush toilets keep running is that one of the parts inside the tank needs attention. During your check-in, simply lift the tank lid and watch a full flush cycle. Listen for strange noises and look for any obvious signs of wear and tear on the components. If you’d rather leave it to the pros, a preventive maintenance plan can help you stay on top of your home’s entire plumbing system without you having to think about it.
Use Proper Cleaning Techniques
When you clean your bathroom, don’t forget about the inside of the toilet tank. Mineral deposits and algae can build up on the rubber flapper seal, preventing it from closing properly and causing a slow leak. Gently clean the flapper and the area it seals with a soft cloth or sponge. Avoid using harsh, in-tank chemical cleaners, as they can corrode the plastic and rubber parts, leading to premature failure. If you notice significant limescale buildup, it might be a sign of hard water, a common issue in Tucson that our team can help you address with our plumbing services.
Know How to Use the Dual Flush Buttons
Dual flush toilets are designed to save water, but they only work correctly if used as intended. The smaller button is for liquids (a half flush), and the larger button is for solids (a full flush). Using the full flush every time puts unnecessary wear on the mechanism. It’s also important to make sure the water level in the tank is set correctly. For most dual flush systems, the water should sit about halfway up the overflow tube. An incorrect water level can interfere with the flushing mechanism and cause the toilet to run continuously.
Watch for Early Warning Signs
Your toilet will often give you clues that something is wrong before it becomes a major issue. The most obvious sign is hearing water running long after the tank should have refilled. You might also see a slow trickle of water running down the inside of the bowl. Don’t ignore these signs. Even a tiny, silent leak from a faulty flapper can waste hundreds of gallons of water a month, leading to a noticeable spike in your water bill. If you spot any of these warning signs and aren’t sure what to do, it’s best to schedule a service call and have an expert take a look.
When to Call Fusion Plumbing & Air for Help
You’ve followed the steps, tinkered with the parts, and given it your best shot, but sometimes a stubborn toilet just refuses to cooperate. While we admire the DIY spirit, there are moments when calling in a professional is the smartest, safest, and most cost-effective move. Knowing when to put down the wrench and pick up the phone can save you from a bigger headache down the road. If you’re in Tucson, Oro Valley, or the surrounding areas, our team at Fusion Plumbing & Air is always ready to step in and get your bathroom back in working order.
When Your DIY Fix Isn’t Working
Let’s be honest: sometimes you hit a wall. If you’ve tried adjusting the chain, cleaning the parts, and checking the water level, but the toilet keeps running, it’s time to call for backup. The issue might be something less obvious, like a faulty fill valve. While some sources note that a fill valve replacement is a “common and inexpensive fix,” it’s a job best left to a professional to ensure it’s done correctly. Instead of spending another afternoon troubleshooting, let our team provide the right residential plumbing solution so you can move on with your day.
For Complex Repairs That Need an Expert
A constantly running toilet can be a symptom of a more complex problem that isn’t immediately obvious. You might notice that “water is still running down the bowl after the tank is full,” which points to a persistent leak that a simple flapper swap might not solve. Our certified technicians have the diagnostic tools and experience to accurately identify the root cause, whether it’s a cracked overflow tube, a poor seal, or an issue with the water pressure. We can quickly resolve the problem, preventing wasted water and the frustration of repeated, unsuccessful repairs.
Handling Plumbing Emergencies in Tucson
A running toilet might not seem like an emergency, but it shouldn’t be ignored. As experts point out, “even a small leak from a running toilet can waste a lot of water and significantly increase your water bill over time.” That constant hissing sound is the sound of money going down the drain. If you’re dealing with a toilet that won’t quit or any other urgent plumbing issue in Tucson, Marana, or Sahuarita, don’t hesitate to reach out. We offer 24/7 emergency services to protect your home and your wallet. You can schedule online for prompt and reliable help.
Related Articles
Frequently Asked Questions
Is a running toilet really that big of a deal? It might seem like a minor annoyance, but that constant running sound is a sign of a continuous leak. Even a small, silent leak can waste hundreds of gallons of water every month, which will definitely show up on your next water bill. Fixing it promptly is one of the smartest things you can do to save money and conserve water.
What’s the quickest way to tell if the problem is the flapper or the fill valve? Here’s a simple trick: put a few drops of food coloring in the toilet tank and wait about 20 minutes without flushing. If you see colored water appear in the bowl, you have a leaky flapper that needs to be replaced. If the water in the bowl stays clear but you can still hear the toilet running or see water spilling into the overflow tube, the issue is most likely a faulty fill valve.
Do I need to buy a specific brand of replacement parts for my toilet? While many parts are universal, it’s always best to get a replacement that matches your toilet’s model. The easiest way to do this is to take a clear picture of the inside of your tank or bring the old part with you to the hardware store. This ensures you get a perfect fit and avoid a second trip.
Can hard water really cause my toilet to run? Absolutely. Here in Tucson, hard water is a common issue. Over time, mineral deposits, or limescale, can build up on the rubber flapper and the flush valve opening. This creates a rough surface that prevents the flapper from forming a watertight seal, leading to a slow but constant leak into the bowl.
I’ve tried the simple fixes, but it’s still running. When should I just call a plumber? If you’ve adjusted the chain and confirmed the flapper is sealing correctly but the toilet is still running, it’s a good time to call for help. The problem could be a more complex issue with the fill valve or even the water pressure to your home. Instead of getting frustrated, calling a professional ensures the job is done right and saves you from any potential water damage.


